Welcome to the Chocolatey Community Package Repository! The packages found in this section of the site are provided, maintained, and moderated by the community.
Moderation
Every version of each package undergoes a rigorous moderation process before it goes live that typically includes:
- Security, consistency, and quality checking
- Installation testing
- Virus checking through VirusTotal
- Human moderators who give final review and sign off
More detail at Security and Moderation.
Organizational Use
If you are an organization using Chocolatey, we want your experience to be fully reliable. Due to the nature of this publicly offered repository, reliability cannot be guaranteed. Packages offered here are subject to distribution rights, which means they may need to reach out further to the internet to the official locations to download files at runtime.
Fortunately, distribution rights do not apply for internal use. With any edition of Chocolatey (including the free open source edition), you can host your own packages and cache or internalize existing community packages.
Disclaimer
Your use of the packages on this site means you understand they are not supported or guaranteed in any way. Learn more...
-
STEP1
Package Review
-
STEP2
Integration Method
-
STEP3
Internal Repo Url
-
STEP4
Environment Setup
-
STEP5
Install Script
Step 1: Review Your Packages
Step 2: Choose Your Integration Method
Step 3: Enter Your Internal Repository Url
(this should look similar to https://community.chocolatey.org/api/v2/)
Step 3: Copy Your Script or Download Config
Option 1: Copy Script
Option 2: Download Config
Step 4: Setup Your Environment
1. Ensure you are set for organizational deployment
Please see the organizational deployment guide
2. Get the package into your environment
Option 1: Cached Package (Unreliable, Requires Internet - Same As Community)-
Open Source or Commercial:
- Proxy Repository - Create a proxy nuget repository on Nexus, Artifactory Pro, or a proxy Chocolatey repository on ProGet. Point your upstream to https://community.chocolatey.org/api/v2/. Packages cache on first access automatically. Make sure your choco clients are using your proxy repository as a source and NOT the default community repository. See source command for more information.
-
You can also just download the packages and push them to a repository
Download Packages
-
Open Source
-
Download the packages:
Download Packages - Follow manual internalization instructions
-
-
Package Internalizer (C4B)
-
Run: (additional options)
-
For package and dependencies run:
- Automate package internalization
-
Run: (additional options)
Step 5: Copy Your Script
See options you can pass to upgrade.
See best practices for scripting.
Add this to a PowerShell script or use a Batch script with tools and in places where you are calling directly to Chocolatey. If you are integrating, keep in mind enhanced exit codes.
If you do use a PowerShell script, use the following to ensure bad exit codes are shown as failures:
## 1. REQUIREMENTS ##
### Here are the requirements necessary to ensure this is successful.
### a. Internal/Private Cloud Repository Set Up ###
#### You'll need an internal/private cloud repository you can use. These are
#### generally really quick to set up and there are quite a few options.
#### Chocolatey Software recommends Nexus, Artifactory Pro, or ProGet as they
#### are repository servers and will give you the ability to manage multiple
#### repositories and types from one server installation.
### b. Download Chocolatey Package and Put on Internal Repository ###
#### You need to have downloaded the Chocolatey package as well.
#### Please see https://chocolatey.org/install#organization
### c. Other Requirements ###
#### We initialize a few things that are needed by this script - there are no other requirements.
$ErrorActionPreference = "Stop"
#### Set TLS 1.2 (3072) as that is the minimum required by various up-to-date repositories.
#### Use integers because the enumeration value for TLS 1.2 won't exist
#### in .NET 4.0, even though they are addressable if .NET 4.5+ is
#### installed (.NET 4.5 is an in-place upgrade).
[System.Net.ServicePointManager]::SecurityProtocol = [System.Net.ServicePointManager]::SecurityProtocol -bor 3072
#### We use this variable for future REST calls.
$RequestArguments = @{
UseBasicParsing = $true
}
## 2. TOP LEVEL VARIABLES ##
### a. Your internal repository url (the main one). ###
#### Should be similar to what you see when you browse
#### to https://community.chocolatey.org/api/v2/
$NugetRepositoryUrl = "INTERNAL REPO URL"
### b. Internal Repository Credential ###
#### If required, add the repository access credential here
# $NugetRepositoryCredential = [PSCredential]::new(
# "username",
# ("password" | ConvertTo-SecureString -AsPlainText -Force)
# )
# $RequestArguments.Credential = $NugetRepositoryCredential
### c. Chocolatey nupkg download url ###
#### This url should result in an immediate download when you navigate to it
$ChocolateyDownloadUrl = "$($NugetRepositoryUrl.TrimEnd('/'))/package/chocolatey.1.1.0.nupkg"
### d. Chocolatey Central Management (CCM) ###
#### If using CCM to manage Chocolatey, add the following:
#### i. Endpoint URL for CCM
# $ChocolateyCentralManagementUrl = "https://chocolatey-central-management:24020/ChocolateyManagementService"
#### ii. If using a Client Salt, add it here
# $ChocolateyCentralManagementClientSalt = "clientsalt"
#### iii. If using a Service Salt, add it here
# $ChocolateyCentralManagementServiceSalt = "servicesalt"
## 3. ENSURE CHOCOLATEY IS INSTALLED ##
### Ensure Chocolatey is installed from your internal repository
#### Download the Nupkg, appending .zip to the filename to handle archive cmdlet limitations
if (-not (Get-Command choco.exe -ErrorAction SilentlyContinue)) {
$TempDirectory = Join-Path $env:Temp "chocolateyInstall"
if (-not (Test-Path $TempDirectory -PathType Container)) {
$null = New-Item -Path $TempDirectory -ItemType Directory
}
$DownloadedNupkg = Join-Path $TempDirectory "$(Split-Path $ChocolateyDownloadUrl -Leaf).zip"
Invoke-WebRequest -Uri $ChocolateyDownloadUrl -OutFile $DownloadedNupkg @RequestArguments
#### Extract the Nupkg, and run the chocolateyInstall script
if (Get-Command Microsoft.PowerShell.Archive\Expand-Archive -ErrorAction SilentlyContinue) {
Microsoft.PowerShell.Archive\Expand-Archive -Path $DownloadedNupkg -DestinationPath $TempDirectory -Force
} else {
# PowerShell versions <4.0 do not have this function available
try {
$shellApplication = New-Object -ComObject Shell.Application
$zipPackage = $shellApplication.NameSpace($DownloadedNupkg)
$destinationFolder = $shellApplication.NameSpace($TempDirectory)
$destinationFolder.CopyHere($zipPackage.Items(), 0x10)
} catch {
Write-Warning "Unable to unzip package using built-in compression."
throw $_
}
}
& $(Join-Path $TempDirectory "tools\chocolateyInstall.ps1")
}
if (-not (Get-Command choco.exe -ErrorAction SilentlyContinue)) {
refreshenv
}
## 4. CONFIGURE CHOCOLATEY BASELINE ##
### a. FIPS Feature ###
#### If you need FIPS compliance - make this the first thing you configure
#### before you do any additional configuration or package installations
# choco feature enable -n useFipsCompliantChecksums
### b. Apply Recommended Configuration ###
#### Move cache location so Chocolatey is very deterministic about
#### cleaning up temporary data and the location is secured to admins
choco config set --name cacheLocation --value C:\ProgramData\chocolatey\cache
#### Increase timeout to at least 4 hours
choco config set --name commandExecutionTimeoutSeconds --value 14400
#### Turn off download progress when running choco through integrations
choco feature disable --name showDownloadProgress
### c. Sources ###
#### Remove the default community package repository source
choco source list --limitoutput | ConvertFrom-Csv -Header 'Name', 'Location' -Delimiter '|' | ForEach-Object {
if ($_.Location -eq 'https://community.chocolatey.org/api/v2/') {
choco source remove -n $_.Name
}
}
#### Add internal default sources
#### You could have multiple sources here, so we will provide an example
#### of one using the remote repo variable here
#### NOTE: This EXAMPLE may require changes
if ($NugetRepositoryCredential) {
choco source add --name ChocolateyInternal --source $NugetRepositoryUrl --user $NugetRepositoryCredential.UserName --password $NugetRepositoryCredential.GetNetworkCredential().Password --priority 1
} else {
choco source add --name ChocolateyInternal --source $NugetRepositoryUrl --priority 1
}
### b. Keep Chocolatey Up To Date ###
#### Keep chocolatey up to date based on your internal source
#### You control the upgrades based on when you push an updated version
#### to your internal repository.
#### Note the source here is to the OData feed, similar to what you see
#### when you browse to https://community.chocolatey.org/api/v2/
choco upgrade chocolatey --confirm
## 5. ENSURE CHOCOLATEY FOR BUSINESS ##
### If you don't have Chocolatey for Business (C4B), you'll want to remove from here down.
### a. Ensure The License File Is Installed ###
#### Create a license package using script from https://docs.chocolatey.org/en-us/how-tos/setup-offline-installation#exercise-4-create-a-package-for-the-license
choco install chocolatey-license --source $NugetRepositoryUrl --confirm
### b. Disable The Licensed Source ###
#### The licensed source cannot be removed, so it must be disabled.
#### This must occur after the license has been set by the license package.
if ("chocolatey-license" -in (choco list --localonly --limitoutput | ConvertFrom-Csv -Header "Name" -Delimiter "|").Name) {
choco source disable --name chocolatey.licensed
} else {
Write-Warning "Not disabling 'chocolatey.licensed' feed, as Chocolatey-License has not been installed."
}
### c. Ensure Chocolatey Licensed Extension ###
#### You will have downloaded the licensed extension to your internal repository
#### as you have disabled the licensed repository in step 5b.
#### Ensure the chocolatey.extension package (aka Chocolatey Licensed Extension)
if ("chocolatey-license" -in (choco list --localonly --limitoutput | ConvertFrom-Csv -Header "Name" -Delimiter "|").Name) {
choco install chocolatey.extension --source $NugetRepositoryUrl --confirm
} else {
Write-Warning "Not installing 'chocolatey.extension', as Chocolatey-License has not been installed."
}
#### The Chocolatey Licensed Extension unlocks all of the following, which also have configuration/feature items available with them. You may want to visit the feature pages to see what you might want to also enable:
#### - Package Builder - https://docs.chocolatey.org/en-us/features/paid/package-builder
#### - Package Internalizer - https://docs.chocolatey.org/en-us/features/paid/package-internalizer
#### - Package Synchronization (3 components) - https://docs.chocolatey.org/en-us/features/paid/package-synchronization
#### - Package Reducer - https://docs.chocolatey.org/en-us/features/paid/package-reducer
#### - Package Audit - https://docs.chocolatey.org/en-us/features/paid/package-audit
#### - Package Throttle - https://docs.chocolatey.org/en-us/features/paid/package-throttle
#### - CDN Cache Access - https://docs.chocolatey.org/en-us/features/paid/private-cdn
#### - Branding - https://docs.chocolatey.org/en-us/features/paid/branding
#### - Self-Service Anywhere (more components will need to be installed and additional configuration will need to be set) - https://docs.chocolatey.org/en-us/features/paid/self-service-anywhere
#### - Chocolatey Central Management (more components will need to be installed and additional configuration will need to be set) - https://docs.chocolatey.org/en-us/features/paid/chocolatey-central-management
#### - Other - https://docs.chocolatey.org/en-us/features/paid/
### d. Ensure Self-Service Anywhere ###
#### If you have desktop clients where users are not administrators, you may
#### to take advantage of deploying and configuring Self-Service anywhere
choco feature disable --name showNonElevatedWarnings
choco feature enable --name useBackgroundService
choco feature enable --name useBackgroundServiceWithNonAdministratorsOnly
choco feature enable --name allowBackgroundServiceUninstallsFromUserInstallsOnly
choco config set --name allowedBackgroundServiceCommands --value "install,upgrade,uninstall"
### e. Ensure Chocolatey Central Management ###
#### If you want to manage and report on endpoints, you can set up and configure
### Central Management. There are multiple portions to manage, so you'll see
### a section on agents here along with notes on how to configure the server
### side components.
if ($ChocolateyCentralManagementUrl) {
choco install chocolatey-agent --source $NugetRepositoryUrl --confirm
choco config set --name CentralManagementServiceUrl --value $ChocolateyCentralManagementUrl
if ($ChocolateyCentralManagementClientSalt) {
choco config set --name centralManagementClientCommunicationSaltAdditivePassword --value $ChocolateyCentralManagementClientSalt
}
if ($ChocolateyCentralManagementServiceSalt) {
choco config set --name centralManagementServiceCommunicationSaltAdditivePassword --value $ChocolateyCentralManagementServiceSalt
}
choco feature enable --name useChocolateyCentralManagement
choco feature enable --name useChocolateyCentralManagementDeployments
}
See docs at https://docs.ansible.com/ansible/latest/modules/win_chocolatey_module.html.
If Applicable - Chocolatey Configuration/Installation
## 1. REQUIREMENTS ##
### Here are the requirements necessary to ensure this is successful.
### a. Internal/Private Cloud Repository Set Up ###
#### You'll need an internal/private cloud repository you can use. These are
#### generally really quick to set up and there are quite a few options.
#### Chocolatey Software recommends Nexus, Artifactory Pro, or ProGet as they
#### are repository servers and will give you the ability to manage multiple
#### repositories and types from one server installation.
### b. Download Chocolatey Package and Put on Internal Repository ###
#### You need to have downloaded the Chocolatey package as well.
#### Please see https://chocolatey.org/install#organization
### c. Other Requirements ###
#### i. chocolatey.chocolatey
##### You will require the chocolatey.chocolatey collection to be installed
##### on all machines using this playbook.
##### Please see https://github.com/chocolatey/chocolatey-ansible/#installing-the-collection-from-ansible-galaxy
- name: Install and Configure Chocolatey
hosts: all
## 2. TOP LEVEL VARIABLES ##
vars:
### a. Your internal repository url (the main one). ###
#### Should be similar to what you see when you browse
#### to https://community.chocolatey.org/api/v2/
nuget_repository_url: INTERNAL REPO URL
### b. Internal Repository Credential ###
#### If required, add the repository access credential here and
#### uncomment lines with source_username and source_password below
# nuget_repository_username: username
# nuget_repository_password: password
### c. Chocolatey Central Management (CCM) ###
#### If using CCM to manage Chocolatey, add the following:
#### i. Endpoint URL for CCM
# chocolatey_central_management_url: https://chocolatey-central-management:24020/ChocolateyManagementService
#### ii. If using a Client Salt, add it here
# chocolatey_central_management_client_salt: clientsalt
#### iii. If using a Service Salt, add it here
# chocolatey_central_management_service_salt: servicesalt
## 3. ENSURE CHOCOLATEY IS INSTALLED ##
### Ensure Chocolatey is installed from your internal repository
tasks:
- name: Install chocolatey
win_chocolatey:
name: chocolatey
source: {{ nuget_repository_url }}
# source_username: {{ nuget_repository_username }}
# source_password: {{ nuget_repository_password }}
## 4. CONFIGURE CHOCOLATEY BASELINE ##
### a. FIPS Feature ###
#### If you need FIPS compliance - make this the first thing you configure
#### before you do any additional configuration or package installations
# - name: Enable FIPS compliance
# win_chocolatey_feature:
# name: useFipsCompliantChecksums
# state: enabled
### b. Apply Recommended Configuration ###
#### Move cache location so Chocolatey is very deterministic about
#### cleaning up temporary data and the location is secured to admins
- name: Set the cache location
win_chocolatey_config:
name: cacheLocation
state: present
value: C:\ProgramData\chocolatey\cache
#### Increase timeout to at least 4 hours
- name: Set the command execution timeout
win_chocolatey_config:
name: commandExecutionTimeoutSeconds
state: present
value: 14400
#### Turn off download progress when running choco through integrations
- name: Disable showing download progress
win_chocolatey_feature:
name: showDownloadProgress
state: disabled
### c. Sources ###
#### Remove the default community package repository source
- name: Remove Chocolatey Community Repository
win_chocolatey_source:
name: chocolatey
state: absent
#### Add internal default sources
#### You could have multiple sources here, so we will provide an example
#### of one using the remote repo variable here
#### NOTE: This EXAMPLE may require changes
- name: Add Internal Repository
win_chocolatey_source:
name: ChocolateyInternal
state: present
source: {{ nuget_repository_url }}
# source_username: {{ nuget_repository_username }}
# source_password: {{ nuget_repository_password }}
priority: 1
### b. Keep Chocolatey Up To Date ###
#### Keep chocolatey up to date based on your internal source
#### You control the upgrades based on when you push an updated version
#### to your internal repository.
#### Note the source here is to the OData feed, similar to what you see
#### when you browse to https://community.chocolatey.org/api/v2/
- name: Upgrade Chocolatey
win_chocolatey:
name: chocolatey
state: latest
## 5. ENSURE CHOCOLATEY FOR BUSINESS ##
### If you don't have Chocolatey for Business (C4B), you'll want to remove from here down.
### a. Ensure The License File Is Installed ###
#### Create a license package using script from https://docs.chocolatey.org/en-us/how-tos/setup-offline-installation#exercise-4-create-a-package-for-the-license
- name: Install Chocolatey License
win_chocolatey:
name: chocolatey-license
source: ChocolateyInternal
state: latest
### b. Disable The Licensed Source ###
#### The licensed source cannot be removed, so it must be disabled.
#### This must occur after the license has been set by the license package.
- name: Disable Chocolatey Community Repository
win_chocolatey_source:
name: chocolatey.licensed
state: disabled
### c. Ensure Chocolatey Licensed Extension ###
#### You will have downloaded the licensed extension to your internal repository
#### as you have disabled the licensed repository in step 5b.
#### Ensure the chocolatey.extension package (aka Chocolatey Licensed Extension)
- name: Install Chocolatey Extension
win_chocolatey:
name: chocolatey.extension
source: ChocolateyInternal
state: latest
#### The Chocolatey Licensed Extension unlocks all of the following, which also have configuration/feature items available with them. You may want to visit the feature pages to see what you might want to also enable:
#### - Package Builder - https://docs.chocolatey.org/en-us/features/paid/package-builder
#### - Package Internalizer - https://docs.chocolatey.org/en-us/features/paid/package-internalizer
#### - Package Synchronization (3 components) - https://docs.chocolatey.org/en-us/features/paid/package-synchronization
#### - Package Reducer - https://docs.chocolatey.org/en-us/features/paid/package-reducer
#### - Package Audit - https://docs.chocolatey.org/en-us/features/paid/package-audit
#### - Package Throttle - https://docs.chocolatey.org/en-us/features/paid/package-throttle
#### - CDN Cache Access - https://docs.chocolatey.org/en-us/features/paid/private-cdn
#### - Branding - https://docs.chocolatey.org/en-us/features/paid/branding
#### - Self-Service Anywhere (more components will need to be installed and additional configuration will need to be set) - https://docs.chocolatey.org/en-us/features/paid/self-service-anywhere
#### - Chocolatey Central Management (more components will need to be installed and additional configuration will need to be set) - https://docs.chocolatey.org/en-us/features/paid/chocolatey-central-management
#### - Other - https://docs.chocolatey.org/en-us/features/paid/
### d. Ensure Self-Service Anywhere ###
#### If you have desktop clients where users are not administrators, you may
#### to take advantage of deploying and configuring Self-Service anywhere
- name: Hide not-elevated warnings
win_chocolatey_feature:
name: showNonElevatedWarnings
state: disabled
- name: Use background mode for self-service
win_chocolatey_feature:
name: useBackgroundService
state: enabled
- name: Use background service for non-admins
win_chocolatey_feature:
name: useBackgroundServiceWithNonAdministratorsOnly
state: enabled
- name: Allow background uninstallation for user installs
win_chocolatey_feature:
name: allowBackgroundServiceUninstallsFromUserInstallsOnly
state: enabled
- name: Set allowed background service commands
win_chocolatey_config:
name: backgroundServiceAllowedCommands
state: present
value: install,upgrade,uninstall
### e. Ensure Chocolatey Central Management ###
#### If you want to manage and report on endpoints, you can set up and configure
### Central Management. There are multiple portions to manage, so you'll see
### a section on agents here along with notes on how to configure the server
### side components.
- name: Install Chocolatey Agent
when: chocolatey_central_management_url is defined
win_chocolatey:
name: chocolatey-agent
source: ChocolateyInternal
state: latest
- name: Set the Central Management Service URL
when: chocolatey_central_management_url is defined
win_chocolatey_config:
name: CentralManagementServiceUrl
state: present
value: {{ chocolatey_central_management_url }}
- name: Set the Central Management Client Salt
when: chocolatey_central_management_client_salt is defined
win_chocolatey_config:
name: centralManagementClientCommunicationSaltAdditivePassword
state: present
value: {{ chocolatey_central_management_client_salt }}
- name: Set the Central Management Service Salt
when: chocolatey_central_management_service_salt is defined
win_chocolatey_config:
name: centralManagementServiceCommunicationSaltAdditivePassword
state: present
value: {{ chocolatey_central_management_service_salt }}
- name: Use Central Management
when: chocolatey_central_management_url is defined
win_chocolatey_feature:
name: useChocolateyCentralManagement
state: enabled
- name: Use Central Management Deployments
when: chocolatey_central_management_url is defined
win_chocolatey_feature:
name: useChocolateyCentralManagementDeployments
state: enabled
See docs at https://docs.chef.io/resource_chocolatey_package.html.
If Applicable - Chocolatey Configuration/Installation
## 1. REQUIREMENTS ##
### Here are the requirements necessary to ensure this is successful.
### a. Internal/Private Cloud Repository Set Up ###
#### You'll need an internal/private cloud repository you can use. These are
#### generally really quick to set up and there are quite a few options.
#### Chocolatey Software recommends Nexus, Artifactory Pro, or ProGet as they
#### are repository servers and will give you the ability to manage multiple
#### repositories and types from one server installation.
### b. Download Chocolatey Package and Put on Internal Repository ###
#### You need to have downloaded the Chocolatey package as well.
#### Please see https://chocolatey.org/install#organization
### c. Other Requirements ###
#### The Chocolatey resources are available with any recent version of Chef.
#### We utilise the Chocolatey recipe to install the Chocolatey binaries.
include_recipe "chocolatey"
## 2. TOP LEVEL VARIABLES ##
### a. Your internal repository url (the main one). ###
#### Should be similar to what you see when you browse
#### to https://community.chocolatey.org/api/v2/
NugetRepositoryUrl = "INTERNAL REPO URL"
### b. Internal Repository Credential ###
#### If required, add the repository access credential here
# NugetRepositoryUsername = "username"
# NugetRepositoryPassword = "password"
### c. Chocolatey nupkg download url ###
#### This url should result in an immediate download when you navigate to it in
#### a web browser
ChocolateyNupkgUrl = "INTERNAL REPO URL/package/chocolatey.1.1.0.nupkg",
### d. Chocolatey Central Management (CCM) ###
#### If using CCM to manage Chocolatey, add the following:
#### i. Endpoint URL for CCM
# ChocolateyCentralManagementUrl = "https://chocolatey-central-management:24020/ChocolateyManagementService"
#### ii. If using a Client Salt, add it here
# ChocolateyCentralManagementClientSalt = "clientsalt"
#### iii. If using a Service Salt, add it here
# ChocolateyCentralManagementServiceSalt = "servicesalt"
## 3. ENSURE CHOCOLATEY IS INSTALLED ##
### Ensure Chocolatey is installed from your internal repository
node['chocolatey']['install vars'] = {
'chocolateyDownloadUrl' => "#{ChocolateyNupkgUrl}",
}
## 4. CONFIGURE CHOCOLATEY BASELINE ##
### a. FIPS Feature ###
#### If you need FIPS compliance - make this the first thing you configure
#### before you do any additional configuration or package installations
# chocolatey_feature 'useFipsCompliantChecksums' do
# action :enable
# end
### b. Apply Recommended Configuration ###
#### Move cache location so Chocolatey is very deterministic about
#### cleaning up temporary data and the location is secured to admins
chocolatey_config 'cacheLocation' do
value 'C:\ProgramData\chocolatey\cache'
end
#### Increase timeout to at least 4 hours
chocolatey_config 'commandExecutionTimeoutSeconds' do
value '14400'
end
#### Turn off download progress when running choco through integrations
chocolatey_feature 'showDownloadProgress' do
action :disable
end
### c. Sources ###
#### Remove the default community package repository source
chocolatey_source 'chocolatey' do
action :remove
end
#### Add internal default sources
#### You could have multiple sources here, so we will provide an example
#### of one using the remote repo variable here
#### NOTE: This EXAMPLE may require changes
chocolatey_source 'ChocolateyInternal' do
source "#{NugetRepositoryUrl}"
priority 1
action :add
end
execute 'ChocolateyInternal' do
command "choco source add --name ChocolateyInternal -s #{NugetRepositoryUrl} -u=#{NugetRepositoryUsername} -p=#{NugetRepositoryPassword} --priority=1"
only_if { NugetRepositoryUsername != nil || NugetRepositoryPassword != nil }
end
### b. Keep Chocolatey Up To Date ###
#### Keep chocolatey up to date based on your internal source
#### You control the upgrades based on when you push an updated version
#### to your internal repository.
#### Note the source here is to the OData feed, similar to what you see
#### when you browse to https://community.chocolatey.org/api/v2/
chocolatey_package 'chocolatey' do
action :upgrade
source "#{NugetRepositoryUrl}"
end
## 5. ENSURE CHOCOLATEY FOR BUSINESS ##
### If you don't have Chocolatey for Business (C4B), you'll want to remove from here down.
### a. Ensure The License File Is Installed ###
#### Create a license package using script from https://docs.chocolatey.org/en-us/how-tos/setup-offline-installation#exercise-4-create-a-package-for-the-license
chocolatey_package 'chocolatey-license' do
action :install
source "#{NugetRepositoryUrl}"
end
### b. Disable The Licensed Source ###
#### The licensed source cannot be removed, so it must be disabled.
#### This must occur after the license has been set by the license package.
chocolatey_source 'chocolatey.licensed' do
action :disable
end
### c. Ensure Chocolatey Licensed Extension ###
#### You will have downloaded the licensed extension to your internal repository
#### as you have disabled the licensed repository in step 5b.
#### Ensure the chocolatey.extension package (aka Chocolatey Licensed Extension)
chocolatey_package 'chocolatey.extention' do
action install
source "#{NugetRepositoryUrl}"
end
#### The Chocolatey Licensed Extension unlocks all of the following, which also have configuration/feature items available with them. You may want to visit the feature pages to see what you might want to also enable:
#### - Package Builder - https://docs.chocolatey.org/en-us/features/paid/package-builder
#### - Package Internalizer - https://docs.chocolatey.org/en-us/features/paid/package-internalizer
#### - Package Synchronization (3 components) - https://docs.chocolatey.org/en-us/features/paid/package-synchronization
#### - Package Reducer - https://docs.chocolatey.org/en-us/features/paid/package-reducer
#### - Package Audit - https://docs.chocolatey.org/en-us/features/paid/package-audit
#### - Package Throttle - https://docs.chocolatey.org/en-us/features/paid/package-throttle
#### - CDN Cache Access - https://docs.chocolatey.org/en-us/features/paid/private-cdn
#### - Branding - https://docs.chocolatey.org/en-us/features/paid/branding
#### - Self-Service Anywhere (more components will need to be installed and additional configuration will need to be set) - https://docs.chocolatey.org/en-us/features/paid/self-service-anywhere
#### - Chocolatey Central Management (more components will need to be installed and additional configuration will need to be set) - https://docs.chocolatey.org/en-us/features/paid/chocolatey-central-management
#### - Other - https://docs.chocolatey.org/en-us/features/paid/
### d. Ensure Self-Service Anywhere ###
#### If you have desktop clients where users are not administrators, you may
#### to take advantage of deploying and configuring Self-Service anywhere
chocolatey_feature 'showNonElevatedWarnings' do
action :disable
end
chocolatey_feature 'useBackgroundService' do
action :enable
end
chocolatey_feature 'useBackgroundServiceWithNonAdministratorsOnly' do
action :enable
end
chocolatey_feature 'allowBackgroundServiceUninstallsFromUserInstallsOnly' do
action :enable
end
chocolatey_config 'backgroundServiceAllowedCommands' do
value 'install,upgrade,uninstall'
end
### e. Ensure Chocolatey Central Management ###
#### If you want to manage and report on endpoints, you can set up and configure
### Central Management. There are multiple portions to manage, so you'll see
### a section on agents here along with notes on how to configure the server
### side components.
chocolatey_package 'chocolatey-agent' do
action install
source "#{NugetRepositoryUrl}"
# user "#{NugetRepositoryUsername}"
# password "#{NugetRepositoryPassword}"
only_if { ChocolateyCentralManagementUrl != nil }
end
chocolatey_config 'CentralManagementServiceUrl' do
value "#{ChocolateyCentralManagementUrl}"
only_if { ChocolateyCentralManagementUrl != nil }
end
chocolatey_config 'centralManagementClientCommunicationSaltAdditivePassword' do
value "#{ChocolateyCentralManagementClientSalt}"
only_if { ChocolateyCentralManagementClientSalt != nil }
end
chocolatey_config 'centralManagementServiceCommunicationSaltAdditivePassword' do
value "#{ChocolateyCentralManagementServiceSalt}"
only_if { ChocolateyCentralManagementServiceSalt != nil }
end
chocolatey_feature 'useChocolateyCentralManagement' do
action :enable
only_if { ChocolateyCentralManagementUrl != nil }
end
chocolatey_feature 'useChocolateyCentralManagementDeployments' do
action :enable
only_if { ChocolateyCentralManagementUrl != nil }
end
Requires cChoco DSC Resource. See docs at https://github.com/chocolatey/cChoco.
If Applicable - Chocolatey Configuration/Installation
#requires -Modules cChoco
## 1. REQUIREMENTS ##
### Here are the requirements necessary to ensure this is successful.
### a. Internal/Private Cloud Repository Set Up ###
#### You'll need an internal/private cloud repository you can use. These are
#### generally really quick to set up and there are quite a few options.
#### Chocolatey Software recommends Nexus, Artifactory Pro, or ProGet as they
#### are repository servers and will give you the ability to manage multiple
#### repositories and types from one server installation.
### b. Download Chocolatey Package and Put on Internal Repository ###
#### You need to have downloaded the Chocolatey package as well.
#### Please see https://chocolatey.org/install#organization
### c. Other Requirements ###
#### i. Requires chocolatey\cChoco DSC module to be installed on the machine compiling the DSC manifest
#### NOTE: This will need to be installed before running the DSC portion of this script
if (-not (Get-Module cChoco -ListAvailable)) {
$null = Install-PackageProvider -Name NuGet -MinimumVersion 2.8.5.201 -Force
if (($PSGallery = Get-PSRepository -Name PSGallery).InstallationPolicy -ne "Trusted") {
Set-PSRepository -Name PSGallery -InstallationPolicy Trusted
}
Install-Module -Name cChoco
if ($PSGallery.InstallationPolicy -ne "Trusted") {
Set-PSRepository -Name PSGallery -InstallationPolicy $PSGallery.InstallationPolicy
}
}
#### ii. Requires a hosted copy of the install.ps1 script
##### This should be available to download without authentication.
##### The original script can be found here: https://community.chocolatey.org/install.ps1
Configuration ChocolateyConfig {
## 2. TOP LEVEL VARIABLES ##
param(
### a. Your internal repository url (the main one). ###
#### Should be similar to what you see when you browse
#### to https://community.chocolatey.org/api/v2/
$NugetRepositoryUrl = "INTERNAL REPO URL",
### b. Chocolatey nupkg download url ###
#### This url should result in an immediate download when you navigate to it in
#### a web browser
$ChocolateyNupkgUrl = "INTERNAL REPO URL/package/chocolatey.1.1.0.nupkg",
### c. Internal Repository Credential ###
#### If required, add the repository access credential here
# $NugetRepositoryCredential = [PSCredential]::new(
# "username",
# ("password" | ConvertTo-SecureString -AsPlainText -Force)
# ),
### d. Install.ps1 URL
#### The path to the hosted install script:
$ChocolateyInstallPs1Url = "https://community.chocolatey.org/install.ps1"
### e. Chocolatey Central Management (CCM) ###
#### If using CCM to manage Chocolatey, add the following:
#### i. Endpoint URL for CCM
# $ChocolateyCentralManagementUrl = "https://chocolatey-central-management:24020/ChocolateyManagementService",
#### ii. If using a Client Salt, add it here
# $ChocolateyCentralManagementClientSalt = "clientsalt",
#### iii. If using a Service Salt, add it here
# $ChocolateyCentralManagementServiceSalt = "servicesalt"
)
Import-DscResource -ModuleName PSDesiredStateConfiguration
Import-DscResource -ModuleName cChoco
Node 'localhost' {
## 3. ENSURE CHOCOLATEY IS INSTALLED ##
### Ensure Chocolatey is installed from your internal repository
Environment chocoDownloadUrl {
Name = "chocolateyDownloadUrl"
Value = $ChocolateyNupkgUrl
}
cChocoInstaller installChocolatey {
DependsOn = "[Environment]chocoDownloadUrl"
InstallDir = Join-Path $env:ProgramData "chocolatey"
ChocoInstallScriptUrl = $ChocolateyInstallPs1Url
}
## 4. CONFIGURE CHOCOLATEY BASELINE ##
### a. FIPS Feature ###
#### If you need FIPS compliance - make this the first thing you configure
#### before you do any additional configuration or package installations
# cChocoFeature featureFipsCompliance {
# FeatureName = "useFipsCompliantChecksums"
# }
### b. Apply Recommended Configuration ###
#### Move cache location so Chocolatey is very deterministic about
#### cleaning up temporary data and the location is secured to admins
cChocoConfig cacheLocation {
DependsOn = "[cChocoInstaller]installChocolatey"
ConfigName = "cacheLocation"
Value = "C:\ProgramData\chocolatey\cache"
}
#### Increase timeout to at least 4 hours
cChocoConfig commandExecutionTimeoutSeconds {
DependsOn = "[cChocoInstaller]installChocolatey"
ConfigName = "commandExecutionTimeoutSeconds"
Value = 14400
}
#### Turn off download progress when running choco through integrations
cChocoFeature showDownloadProgress {
DependsOn = "[cChocoInstaller]installChocolatey"
FeatureName = "showDownloadProgress"
Ensure = "Absent"
}
### c. Sources ###
#### Remove the default community package repository source
cChocoSource removeCommunityRepository {
DependsOn = "[cChocoInstaller]installChocolatey"
Name = "chocolatey"
Ensure = "Absent"
}
#### Add internal default sources
#### You could have multiple sources here, so we will provide an example
#### of one using the remote repo variable here.
#### NOTE: This EXAMPLE may require changes
cChocoSource addInternalSource {
DependsOn = "[cChocoInstaller]installChocolatey"
Name = "ChocolateyInternal"
Source = $NugetRepositoryUrl
Credentials = $NugetRepositoryCredential
Priority = 1
}
### b. Keep Chocolatey Up To Date ###
#### Keep chocolatey up to date based on your internal source
#### You control the upgrades based on when you push an updated version
#### to your internal repository.
#### Note the source here is to the OData feed, similar to what you see
#### when you browse to https://community.chocolatey.org/api/v2/
cChocoPackageInstaller updateChocolatey {
DependsOn = "[cChocoSource]addInternalSource", "[cChocoSource]removeCommunityRepository"
Name = "chocolatey"
AutoUpgrade = $true
}
## 5. ENSURE CHOCOLATEY FOR BUSINESS ##
### If you don't have Chocolatey for Business (C4B), you'll want to remove from here down.
### a. Ensure The License File Is Installed ###
#### Create a license package using script from https://docs.chocolatey.org/en-us/how-tos/setup-offline-installation#exercise-4-create-a-package-for-the-license
cChocoPackageInstaller chocolateyLicense {
DependsOn = "[cChocoPackageInstaller]updateChocolatey"
Name = "chocolatey-license"
}
### b. Disable The Licensed Source ###
#### The licensed source cannot be removed, so it must be disabled.
#### This must occur after the license has been set by the license package.
Script disableLicensedSource {
DependsOn = "[cChocoPackageInstaller]chocolateyLicense"
GetScript = {
$Source = choco source list --limitoutput | `
ConvertFrom-Csv -Delimiter '|' -Header Name, Source, Disabled | `
Where-Object Name -eq "chocolatey.licensed"
return @{
Result = if ($Source) {
[bool]::Parse($Source.Disabled)
} else {
Write-Warning "Source 'chocolatey.licensed' was not present."
$true # Source does not need disabling
}
}
}
SetScript = {
$null = choco source disable --name "chocolatey.licensed"
}
TestScript = {
$State = [ScriptBlock]::Create($GetScript).Invoke()
return $State.Result
}
}
### c. Ensure Chocolatey Licensed Extension ###
#### You will have downloaded the licensed extension to your internal repository
#### as you have disabled the licensed repository in step 5b.
#### Ensure the chocolatey.extension package (aka Chocolatey Licensed Extension)
cChocoPackageInstaller chocolateyLicensedExtension {
DependsOn = "[Script]disableLicensedSource"
Name = "chocolatey.extension"
}
#### The Chocolatey Licensed Extension unlocks all of the following, which also have configuration/feature items available with them. You may want to visit the feature pages to see what you might want to also enable:
#### - Package Builder - https://docs.chocolatey.org/en-us/features/paid/package-builder
#### - Package Internalizer - https://docs.chocolatey.org/en-us/features/paid/package-internalizer
#### - Package Synchronization (3 components) - https://docs.chocolatey.org/en-us/features/paid/package-synchronization
#### - Package Reducer - https://docs.chocolatey.org/en-us/features/paid/package-reducer
#### - Package Audit - https://docs.chocolatey.org/en-us/features/paid/package-audit
#### - Package Throttle - https://docs.chocolatey.org/en-us/features/paid/package-throttle
#### - CDN Cache Access - https://docs.chocolatey.org/en-us/features/paid/private-cdn
#### - Branding - https://docs.chocolatey.org/en-us/features/paid/branding
#### - Self-Service Anywhere (more components will need to be installed and additional configuration will need to be set) - https://docs.chocolatey.org/en-us/features/paid/self-service-anywhere
#### - Chocolatey Central Management (more components will need to be installed and additional configuration will need to be set) - https://docs.chocolatey.org/en-us/features/paid/chocolatey-central-management
#### - Other - https://docs.chocolatey.org/en-us/features/paid/
### d. Ensure Self-Service Anywhere ###
#### If you have desktop clients where users are not administrators, you may
#### to take advantage of deploying and configuring Self-Service anywhere
cChocoFeature hideElevatedWarnings {
DependsOn = "[cChocoPackageInstaller]chocolateyLicensedExtension"
FeatureName = "showNonElevatedWarnings"
Ensure = "Absent"
}
cChocoFeature useBackgroundService {
DependsOn = "[cChocoPackageInstaller]chocolateyLicensedExtension"
FeatureName = "useBackgroundService"
Ensure = "Present"
}
cChocoFeature useBackgroundServiceWithNonAdmins {
DependsOn = "[cChocoPackageInstaller]chocolateyLicensedExtension"
FeatureName = "useBackgroundServiceWithNonAdministratorsOnly"
Ensure = "Present"
}
cChocoFeature useBackgroundServiceUninstallsForUserInstalls {
DependsOn = "[cChocoPackageInstaller]chocolateyLicensedExtension"
FeatureName = "allowBackgroundServiceUninstallsFromUserInstallsOnly"
Ensure = "Present"
}
cChocoConfig allowedBackgroundServiceCommands {
DependsOn = "[cChocoFeature]useBackgroundService"
ConfigName = "backgroundServiceAllowedCommands"
Value = "install,upgrade,uninstall"
}
### e. Ensure Chocolatey Central Management ###
#### If you want to manage and report on endpoints, you can set up and configure
### Central Management. There are multiple portions to manage, so you'll see
### a section on agents here along with notes on how to configure the server
### side components.
if ($ChocolateyCentralManagementUrl) {
cChocoPackageInstaller chocolateyAgent {
DependsOn = "[cChocoPackageInstaller]chocolateyLicensedExtension"
Name = "chocolatey-agent"
}
cChocoConfig centralManagementServiceUrl {
DependsOn = "[cChocoPackageInstaller]chocolateyAgent"
ConfigName = "CentralManagementServiceUrl"
Value = $ChocolateyCentralManagementUrl
}
if ($ChocolateyCentralManagementClientSalt) {
cChocoConfig centralManagementClientSalt {
DependsOn = "[cChocoPackageInstaller]chocolateyAgent"
ConfigName = "centralManagementClientCommunicationSaltAdditivePassword"
Value = $ChocolateyCentralManagementClientSalt
}
}
if ($ChocolateyCentralManagementServiceSalt) {
cChocoConfig centralManagementServiceSalt {
DependsOn = "[cChocoPackageInstaller]chocolateyAgent"
ConfigName = "centralManagementServiceCommunicationSaltAdditivePassword"
Value = $ChocolateyCentralManagementServiceSalt
}
}
cChocoFeature useCentralManagement {
DependsOn = "[cChocoPackageInstaller]chocolateyAgent"
FeatureName = "useChocolateyCentralManagement"
Ensure = "Present"
}
cChocoFeature useCentralManagementDeployments {
DependsOn = "[cChocoPackageInstaller]chocolateyAgent"
FeatureName = "useChocolateyCentralManagementDeployments"
Ensure = "Present"
}
}
}
}
# If working this into an existing configuration with a good method for
$ConfigData = @{
AllNodes = @(
@{
NodeName = "localhost"
PSDscAllowPlainTextPassword = $true
}
)
}
try {
Push-Location $env:Temp
$Config = ChocolateyConfig -ConfigurationData $ConfigData
Start-DscConfiguration -Path $Config.PSParentPath -Wait -Verbose -Force
} finally {
Pop-Location
}
Requires Puppet Chocolatey Provider module. See docs at https://forge.puppet.com/puppetlabs/chocolatey.
If Applicable - Chocolatey Configuration/Installation
## 1. REQUIREMENTS ##
### Here are the requirements necessary to ensure this is successful.
### a. Internal/Private Cloud Repository Set Up ###
#### You'll need an internal/private cloud repository you can use. These are
#### generally really quick to set up and there are quite a few options.
#### Chocolatey Software recommends Nexus, Artifactory Pro, or ProGet as they
#### are repository servers and will give you the ability to manage multiple
#### repositories and types from one server installation.
### b. Download Chocolatey Package and Put on Internal Repository ###
#### You need to have downloaded the Chocolatey package as well.
#### Please see https://chocolatey.org/install#organization
### c. Other Requirements ###
#### i. Requires puppetlabs/chocolatey module
#### See https://forge.puppet.com/puppetlabs/chocolatey
## 2. TOP LEVEL VARIABLES ##
### a. Your internal repository url (the main one). ###
#### Should be similar to what you see when you browse
#### to https://community.chocolatey.org/api/v2/
$_repository_url = 'INTERNAL REPO URL'
### b. Chocolatey nupkg download url ###
#### This url should result in an immediate download when you navigate to it in
#### a web browser
$_choco_download_url = 'INTERNAL REPO URL/package/chocolatey.1.1.0.nupkg'
### c. Chocolatey Central Management (CCM) ###
#### If using CCM to manage Chocolatey, add the following:
#### i. Endpoint URL for CCM
# $_chocolatey_central_management_url = 'https://chocolatey-central-management:24020/ChocolateyManagementService'
#### ii. If using a Client Salt, add it here
# $_chocolatey_central_management_client_salt = "clientsalt"
#### iii. If using a Service Salt, add it here
# $_chocolatey_central_management_service_salt = 'servicesalt'
## 3. ENSURE CHOCOLATEY IS INSTALLED ##
### Ensure Chocolatey is installed from your internal repository
### Note: `chocolatey_download_url is completely different than normal
### source locations. This is directly to the bare download url for the
### chocolatey.nupkg, similar to what you see when you browse to
### https://community.chocolatey.org/api/v2/package/chocolatey
class {'chocolatey':
chocolatey_download_url => $_choco_download_url,
use_7zip => false,
}
## 4. CONFIGURE CHOCOLATEY BASELINE ##
### a. FIPS Feature ###
#### If you need FIPS compliance - make this the first thing you configure
#### before you do any additional configuration or package installations
#chocolateyfeature {'useFipsCompliantChecksums':
# ensure => enabled,
#}
### b. Apply Recommended Configuration ###
#### Move cache location so Chocolatey is very deterministic about
#### cleaning up temporary data and the location is secured to admins
chocolateyconfig {'cacheLocation':
value => 'C:\ProgramData\chocolatey\cache',
}
#### Increase timeout to at least 4 hours
chocolateyconfig {'commandExecutionTimeoutSeconds':
value => '14400',
}
#### Turn off download progress when running choco through integrations
chocolateyfeature {'showDownloadProgress':
ensure => disabled,
}
### c. Sources ###
#### Remove the default community package repository source
chocolateysource {'chocolatey':
ensure => absent,
location => 'https://community.chocolatey.org/api/v2/',
}
#### Add internal default sources
#### You could have multiple sources here, so we will provide an example
#### of one using the remote repo variable here
#### NOTE: This EXAMPLE requires changes
chocolateysource {'internal_chocolatey':
ensure => present,
location => $_repository_url,
priority => 1,
username => 'optional',
password => 'optional,not ensured',
bypass_proxy => true,
admin_only => false,
allow_self_service => false,
}
### b. Keep Chocolatey Up To Date ###
#### Keep chocolatey up to date based on your internal source
#### You control the upgrades based on when you push an updated version
#### to your internal repository.
#### Note the source here is to the OData feed, similar to what you see
#### when you browse to https://community.chocolatey.org/api/v2/
package {'chocolatey':
ensure => latest,
provider => chocolatey,
source => $_repository_url,
}
## 5. ENSURE CHOCOLATEY FOR BUSINESS ##
### If you don't have Chocolatey for Business (C4B), you'll want to remove from here down.
### a. Ensure The License File Is Installed ###
#### Create a license package using script from https://docs.chocolatey.org/en-us/guides/organizations/organizational-deployment-guide#exercise-4-create-a-package-for-the-license
# TODO: Add resource for installing/ensuring the chocolatey-license package
package {'chocolatey-license':
ensure => latest,
provider => chocolatey,
source => $_repository_url,
}
### b. Disable The Licensed Source ###
#### The licensed source cannot be removed, so it must be disabled.
#### This must occur after the license has been set by the license package.
## Disabled sources still need all other attributes until
## https://tickets.puppetlabs.com/browse/MODULES-4449 is resolved.
## Password is necessary with user, but not ensurable, so it should not
## matter what it is set to here. If you ever do get into trouble here,
## the password is your license GUID.
chocolateysource {'chocolatey.licensed':
ensure => disabled,
priority => '10',
user => 'customer',
password => '1234',
require => Package['chocolatey-license'],
}
### c. Ensure Chocolatey Licensed Extension ###
#### You will have downloaded the licensed extension to your internal repository
#### as you have disabled the licensed repository in step 5b.
#### Ensure the chocolatey.extension package (aka Chocolatey Licensed Extension)
package {'chocolatey.extension':
ensure => latest,
provider => chocolatey,
source => $_repository_url,
require => Package['chocolatey-license'],
}
#### The Chocolatey Licensed Extension unlocks all of the following, which also have configuration/feature items available with them. You may want to visit the feature pages to see what you might want to also enable:
#### - Package Builder - https://docs.chocolatey.org/en-us/features/paid/package-builder
#### - Package Internalizer - https://docs.chocolatey.org/en-us/features/paid/package-internalizer
#### - Package Synchronization (3 components) - https://docs.chocolatey.org/en-us/features/paid/package-synchronization
#### - Package Reducer - https://docs.chocolatey.org/en-us/features/paid/package-reducer
#### - Package Audit - https://docs.chocolatey.org/en-us/features/paid/package-audit
#### - Package Throttle - https://docs.chocolatey.org/en-us/features/paid/package-throttle
#### - CDN Cache Access - https://docs.chocolatey.org/en-us/features/paid/private-cdn
#### - Branding - https://docs.chocolatey.org/en-us/features/paid/branding
#### - Self-Service Anywhere (more components will need to be installed and additional configuration will need to be set) - https://docs.chocolatey.org/en-us/features/paid/self-service-anywhere
#### - Chocolatey Central Management (more components will need to be installed and additional configuration will need to be set) - https://docs.chocolatey.org/en-us/features/paid/chocolatey-central-management
#### - Other - https://docs.chocolatey.org/en-us/features/paid/
### d. Ensure Self-Service Anywhere ###
#### If you have desktop clients where users are not administrators, you may
#### to take advantage of deploying and configuring Self-Service anywhere
chocolateyfeature {'showNonElevatedWarnings':
ensure => disabled,
}
chocolateyfeature {'useBackgroundService':
ensure => enabled,
}
chocolateyfeature {'useBackgroundServiceWithNonAdministratorsOnly':
ensure => enabled,
}
chocolateyfeature {'allowBackgroundServiceUninstallsFromUserInstallsOnly':
ensure => enabled,
}
chocolateyconfig {'backgroundServiceAllowedCommands':
value => 'install,upgrade,uninstall',
}
### e. Ensure Chocolatey Central Management ###
#### If you want to manage and report on endpoints, you can set up and configure
### Central Management. There are multiple portions to manage, so you'll see
### a section on agents here along with notes on how to configure the server
### side components.
if $_chocolatey_central_management_url {
package {'chocolatey-agent':
ensure => latest,
provider => chocolatey,
source => $_repository_url,
require => Package['chocolatey-license'],
}
chocolateyconfig {'CentralManagementServiceUrl':
value => $_chocolatey_central_management_url,
}
if $_chocolatey_central_management_client_salt {
chocolateyconfig {'centralManagementClientCommunicationSaltAdditivePassword':
value => $_chocolatey_central_management_client_salt,
}
}
if $_chocolatey_central_management_service_salt {
chocolateyconfig {'centralManagementClientCommunicationSaltAdditivePassword':
value => $_chocolatey_central_management_client_salt,
}
}
chocolateyfeature {'useChocolateyCentralManagement':
ensure => enabled,
require => Package['chocolatey-agent'],
}
chocolateyfeature {'useChocolateyCentralManagementDeployments':
ensure => enabled,
require => Package['chocolatey-agent'],
}
}
Need Help? View our docs or file an issue.
There is already a version of this package in your Script Builder
Current Version | New Version |
---|---|
- Passing
- Failing
- Pending
- Unknown / Exempted

Downloads:
3,339
Downloads of v 2.19.0.0:
40
Last Update:
25 Jan 2022
Package Maintainer(s):
Software Author(s):
- Daniele Pistollato IW3HMH
- Terry G4POP
- Chuck K7PT
- Rolf LA9FFA
- Doug W7DRM
- Peter G3ZSS
- Claus OE6CLD
Tags:
log4om log HAM radio amateur- Software Specific:
- Software Site
- Software License
- Software Docs
- Software Issues
- Package Specific:
- Package Source
- Package outdated?
- Package broken?
- Contact Maintainers
- Contact Site Admins
- Software Vendor?
- Report Abuse
- Download

Log4OM (Install)
This is not the latest version of Log4OM (Install) available.
- 1
- 2
- 3
2.19.0.0 | Updated: 25 Jan 2022
- Software Specific:
- Software Site
- Software License
- Software Docs
- Software Issues
- Package Specific:
- Package Source
- Package outdated?
- Package broken?
- Contact Maintainers
- Contact Site Admins
- Software Vendor?
- Report Abuse
- Download
Downloads:
3,339
Downloads of v 2.19.0.0:
40
Maintainer(s):
Software Author(s):
- Daniele Pistollato IW3HMH
- Terry G4POP
- Chuck K7PT
- Rolf LA9FFA
- Doug W7DRM
- Peter G3ZSS
- Claus OE6CLD
Edit Package
To edit the metadata for a package, please upload an updated version of the package.
Chocolatey's Community Package Repository currently does not allow updating package metadata on the website. This helps ensure that the package itself (and the source used to build the package) remains the one true source of package metadata.
This does require that you increment the package version.
- 1
- 2
- 3
Log4OM (Install)
2.19.0.0
This is not the latest version of Log4OM (Install) available.
- 1
- 2
- 3
Some Checks Are Exempted or Have Failed
Not All Tests Have Passed
Deployment Method: Individual Install, Upgrade, & Uninstall
To install Log4OM (Install), run the following command from the command line or from PowerShell:
To upgrade Log4OM (Install), run the following command from the command line or from PowerShell:
To uninstall Log4OM (Install), run the following command from the command line or from PowerShell:
Deployment Method:
📝 NOTE: This applies to both open source and commercial editions of Chocolatey.
1. Enter Your Internal Repository Url
(this should look similar to https://community.chocolatey.org/api/v2/)
2. Setup Your Environment
1. Ensure you are set for organizational deployment
Please see the organizational deployment guide
2. Get the package into your environment
Option 1: Cached Package (Unreliable, Requires Internet - Same As Community)-
Open Source or Commercial:
- Proxy Repository - Create a proxy nuget repository on Nexus, Artifactory Pro, or a proxy Chocolatey repository on ProGet. Point your upstream to https://community.chocolatey.org/api/v2/. Packages cache on first access automatically. Make sure your choco clients are using your proxy repository as a source and NOT the default community repository. See source command for more information.
- You can also just download the package and push it to a repository Download
-
Open Source
-
Download the package:
Download - Follow manual internalization instructions
-
-
Package Internalizer (C4B)
-
Run: (additional options)
choco download log4om.install --internalize --version=2.19.0.0 --source=https://community.chocolatey.org/api/v2/
-
For package and dependencies run:
choco push --source="'INTERNAL REPO URL'"
- Automate package internalization
-
Run: (additional options)
3. Copy Your Script
choco upgrade log4om.install -y --source="'INTERNAL REPO URL'" --version="'2.19.0.0'" [other options]
See options you can pass to upgrade.
See best practices for scripting.
Add this to a PowerShell script or use a Batch script with tools and in places where you are calling directly to Chocolatey. If you are integrating, keep in mind enhanced exit codes.
If you do use a PowerShell script, use the following to ensure bad exit codes are shown as failures:
choco upgrade log4om.install -y --source="'INTERNAL REPO URL'" --version="'2.19.0.0'"
$exitCode = $LASTEXITCODE
Write-Verbose "Exit code was $exitCode"
$validExitCodes = @(0, 1605, 1614, 1641, 3010)
if ($validExitCodes -contains $exitCode) {
Exit 0
}
Exit $exitCode
- name: Install log4om.install
win_chocolatey:
name: log4om.install
version: '2.19.0.0'
source: INTERNAL REPO URL
state: present
See docs at https://docs.ansible.com/ansible/latest/modules/win_chocolatey_module.html.
chocolatey_package 'log4om.install' do
action :install
source 'INTERNAL REPO URL'
version '2.19.0.0'
end
See docs at https://docs.chef.io/resource_chocolatey_package.html.
cChocoPackageInstaller log4om.install
{
Name = "log4om.install"
Version = "2.19.0.0"
Source = "INTERNAL REPO URL"
}
Requires cChoco DSC Resource. See docs at https://github.com/chocolatey/cChoco.
package { 'log4om.install':
ensure => '2.19.0.0',
provider => 'chocolatey',
source => 'INTERNAL REPO URL',
}
Requires Puppet Chocolatey Provider module. See docs at https://forge.puppet.com/puppetlabs/chocolatey.
4. If applicable - Chocolatey configuration/installation
See infrastructure management matrix for Chocolatey configuration elements and examples.
This package is likely a meta/virtual (*) or an installer (*.install) or portable (*.portable) application package.
- Meta/virtual (*) - has a dependency on the *.install or the *.portable package - it is provided for discoverability and for other packages to take a dependency on.
- Portable (*.portable/*.commandline (deprecated naming convention)/*.tool (deprecated naming convention)) - usually zips or archives that require no administrative access to install.
- Install (*.install/*.app (deprecated naming convention)) - uses native installers, usually requires administrative access to install.
Learn more about chocolatey's distinction of installed versus portable apps and/or learn about this kind of package.
This package was approved as a trusted package on 25 Jan 2022.
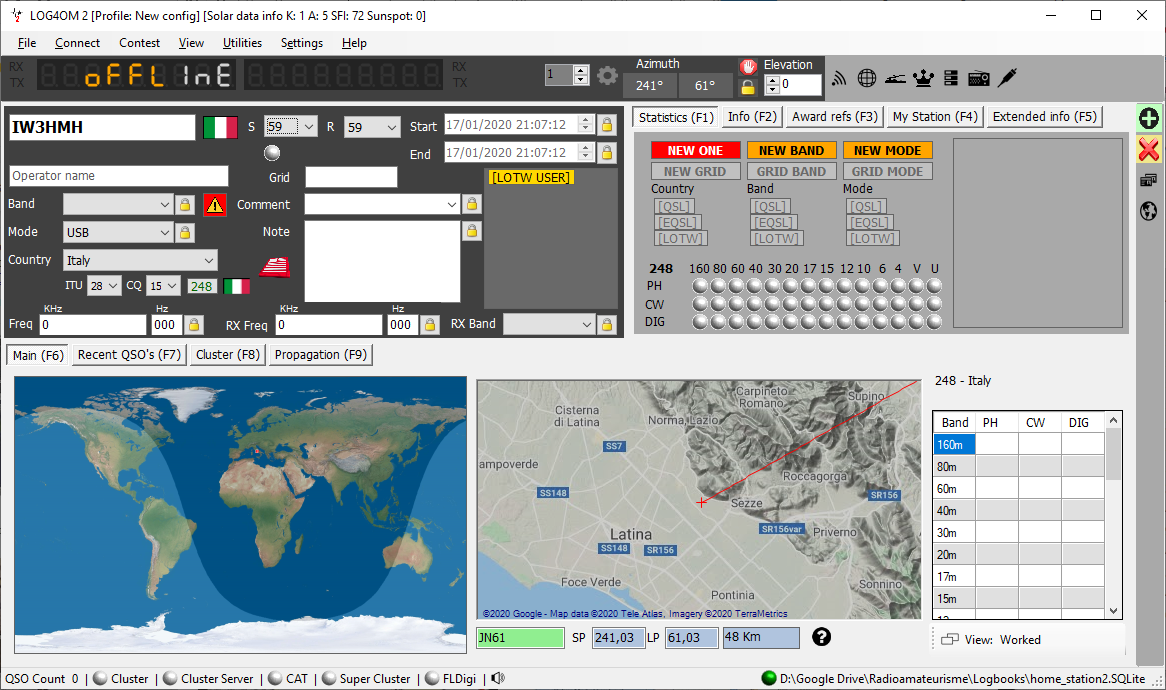
Log4OM is developed by IW3HMH Daniele Pistollato.
Software focused on Ham Radio activity and requires very low resources from the host computer.
It has been tested on all Windows operating systems from Windows Vista to the latest version available. Log4Om runs on Window Tablets with its full features and can be executed from a memory stick, it’s installation doesn’t use system registry to store information. Windows XP SP3 support terminated with release 1.32.1
Note
Users of Log4OM version 1 must export an ADIF file from version 1 and import it into version 2 once a database has been created in version 2 as described in Quick_Start_Guide.pdf.
Features
- Interfaced with QRZ.COM and HAMQTH.COM for rapid searches and QSO data enhancements (massive (Bulk) updates are supported).
- Innovative graphic DX Cluster management, with SPOT real time view on world map and auto tuning of the radio with CAT support.
- Super Cluster: An alternative cluster based on online data sent by users to HRDLog.net
- Complete and unique SOTA support
- MySQL support for large databases and multi operator operations.
- CAT support for numerous radios, through HAMLIB and OMNIRIG
- Cluster integrated with propagation informations by HRDLog.net
- ADIF import and ADIF / Excel (csv) / PDF export
- Integrated with E-QSL, LOTW, ClubLog, HRDLog.net, HamQth, QRZ.COM, SOTA, IOTA
- Complete log searching features, Log4OM enables the OM to update QSO’s offline with updated information.
- Optimized for “paper to electronic” log conversion, with features that drammatically speed up the time taken to insert a QSO (auto-time functions with predefined QSO separations, automatically set timings for fast pile-up management)
- Language selectable English or Italian
- Complete label print feature
- SO2R support
- Innovative NET CONTROL support
- Complete statistics set with support for main awards (ARRL and RSGB IOTA)
- Full K1EL Winkeyer Support
- Huge Award System with more than 50 official awards and an infinite number of user created awards
- Resources and external services are automatically updated
- Software Voice Keyer
Package Parameters
--installargs "'/DIR=c:\\path\\to\\folder'"
- Install LogOM in the specified folder.
From: https://www.log4om.com/l4ong/usermanual/Log4OMNG_ENU.pdf
LICENSE
The software is freely downloadable at https://www.log4om.comand its use is free of charge and available for any purpose.
VERIFICATION
Verification is intended to assist the Chocolatey moderators and community
in verifying that this package's contents are trustworthy.
Package can be verified like this:
1. Download:
x32: https://www.log4om.com/l4ong/release/Log4OM2_2_19_0_0.zip
x64: https://www.log4om.com/l4ong/release/Log4OM2_2_19_0_0.zip
2. You can use one of the following methods to obtain the SHA256 checksum:
- Use powershell function 'Get-FileHash'
- Use Chocolatey utility 'checksum.exe'
checksum type: sha256
checksum32: 73ED92487F49163CE453071D4D94FA9AF9F92468A35A6CB2DAE02679C7E31718
checksum64: 73ED92487F49163CE453071D4D94FA9AF9F92468A35A6CB2DAE02679C7E31718
File 'LICENSE.txt' is obtained from:
https://www.log4om.com/l4ong/usermanual/Log4OMNG_ENU.pdf
$ErrorActionPreference = 'Stop';
$toolsDir = "$(Split-Path -parent $MyInvocation.MyCommand.Definition)"
# Remove previous setup
Remove-Item -Path "$toolsDir\*.exe" -ErrorAction SilentlyContinue
$packageArgs = @{
packageName = $env:ChocolateyPackageName
destination = "$toolsDir"
fileFullPath = "$toolsDir\Log4OM2_2_19_0_0.zip"
}
Get-ChocolateyUnzip @packageArgs
Remove-Item -Path $packageArgs.fileFullPath
$packageArgs = @{
packageName = $env:ChocolateyPackageName
file = "$toolsDir\Log4OM2_2_19_0_0.exe"
silentArgs = '/VERYSILENT /SUPPRESSMSGBOXES /NORESTART /SP- /components=""'
}
Install-ChocolateyInstallPackage @packageArgs
Write-Warning 'Users of Log4OM version 1 must export an ADIF file from version 1 and import it into version 2 once a database has been created in version 2 as described in Quick_Start_Guide.pdf.'
md5: AEEE0F6E3B3937376DB3CDC88F3193A7 | sha1: 1F8BE2E2E3A3825E4224853F83D26D6DA309201B | sha256: 73ED92487F49163CE453071D4D94FA9AF9F92468A35A6CB2DAE02679C7E31718 | sha512: 4866BBA5070A8492275191573A3B3791CD90FE6E28A5D3EF547C5860E6A0C87DD573EECA0B02C010821507D27BDD47B016CE379217A1AE9D009121B93448BA43
Log in or click on link to see number of positives.
- log4om.install.2.19.0.0.nupkg (adab04b13731) - ## / 59
- Log4OM2_2_19_0_0.zip (73ed92487f49) - ## / 59
- Log4OM2_2_19_0_0.exe (b527d6ff270f) - ## / 64
In cases where actual malware is found, the packages are subject to removal. Software sometimes has false positives. Moderators do not necessarily validate the safety of the underlying software, only that a package retrieves software from the official distribution point and/or validate embedded software against official distribution point (where distribution rights allow redistribution).
Chocolatey Pro provides runtime protection from possible malware.
Add to Builder | Version | Downloads | Last Updated | Status |
---|---|---|---|---|
Log4OM (Install) 2.22.0.0 | 26 | Saturday, May 21, 2022 | Approved | |
Log4OM (Install) 2.21.1.0 | 28 | Saturday, April 9, 2022 | Approved | |
Log4OM (Install) 2.21.0.0 | 15 | Tuesday, April 5, 2022 | Approved | |
Log4OM (Install) 2.20.0.0 | 39 | Monday, February 14, 2022 | Approved | |
Log4OM (Install) 2.19.0.0 | 40 | Tuesday, January 25, 2022 | Approved | |
Log4OM (Install) 2.18.0.0 | 51 | Saturday, November 13, 2021 | Approved | |
Log4OM (Install) 2.17.0.0 | 46 | Sunday, September 5, 2021 | Approved | |
Log4OM (Install) 2.16.0.0 | 43 | Tuesday, August 3, 2021 | Approved | |
Log4OM (Install) 2.15.0.0 | 44 | Friday, July 2, 2021 | Approved | |
Log4OM (Install) 2.14.1.00001 | 27 | Friday, July 2, 2021 | Approved | |
Log4OM (Install) 2.14.1.0 | 36 | Wednesday, June 9, 2021 | Approved | |
Log4OM (Install) 2.14.0.0 | 38 | Monday, June 7, 2021 | Approved | |
Log4OM (Install) 2.13.0.0 | 56 | Saturday, April 24, 2021 | Approved | |
Log4OM (Install) 2.12.0.0 | 60 | Sunday, March 28, 2021 | Approved | |
Log4OM (Install) 2.11.0.0 | 80 | Thursday, December 24, 2020 | Approved | |
Log4OM (Install) 2.10.0.0 | 78 | Wednesday, November 18, 2020 | Approved | |
Log4OM (Install) 2.9.0.0 | 91 | Monday, September 14, 2020 | Approved | |
Log4OM (Install) 2.8.0.0 | 112 | Thursday, July 2, 2020 | Approved | |
Log4OM (Install) 2.7.0.0 | 93 | Monday, June 8, 2020 | Approved | |
Log4OM (Install) 2.6.1.0 | 114 | Friday, May 15, 2020 | Approved | |
Log4OM (Install) 2.5.0.0 | 127 | Tuesday, April 21, 2020 | Approved | |
Log4OM (Install) 2.4.0.0001 | 141 | Sunday, March 22, 2020 | Approved | |
Log4OM (Install) 2.4.0.0 | 123 | Wednesday, March 4, 2020 | Approved | |
Log4OM (Install) 2.3.0.0 | 131 | Monday, February 3, 2020 | Approved | |
Log4OM (Install) 2.2.0.0 | 108 | Sunday, January 26, 2020 | Approved | |
Log4OM (Install) 2.1.0.0 | 125 | Tuesday, January 21, 2020 | Approved | |
Log4OM (Install) 2.0.0.1 | 112 | Friday, January 17, 2020 | Approved | |
Log4OM (Install) 2.0.0.0 | 107 | Friday, January 17, 2020 | Approved | |
Log4OM (Install) 1.40.0 | 154 | Thursday, October 24, 2019 | Approved | |
Log4OM (Install) 1.39.0 | 146 | Thursday, August 15, 2019 | Approved | |
Log4OM (Install) 1.38.0 | 144 | Saturday, June 15, 2019 | Approved | |
Log4OM (Install) 1.37.0.20190601 | 137 | Saturday, June 1, 2019 | Approved | |
Log4OM (Install) 1.37.0 | 141 | Monday, May 27, 2019 | Approved | |
Log4OM (Install) 1.36.0.20190504 | 141 | Saturday, May 4, 2019 | Approved | |
Log4OM (Install) 1.36.0.20190314 | 170 | Thursday, March 14, 2019 | Approved | |
Log4OM (Install) 1.36.0 | 158 | Tuesday, March 5, 2019 | Approved |
2011-2012 Daniele Pistollato
Ground Rules:
- This discussion is only about Log4OM (Install) and the Log4OM (Install) package. If you have feedback for Chocolatey, please contact the Google Group.
- This discussion will carry over multiple versions. If you have a comment about a particular version, please note that in your comments.
- The maintainers of this Chocolatey Package will be notified about new comments that are posted to this Disqus thread, however, it is NOT a guarantee that you will get a response. If you do not hear back from the maintainers after posting a message below, please follow up by using the link on the left side of this page or follow this link to contact maintainers. If you still hear nothing back, please follow the package triage process.
- Tell us what you love about the package or Log4OM (Install), or tell us what needs improvement.
- Share your experiences with the package, or extra configuration or gotchas that you've found.
- If you use a url, the comment will be flagged for moderation until you've been whitelisted. Disqus moderated comments are approved on a weekly schedule if not sooner. It could take between 1-5 days for your comment to show up.