Welcome to the Chocolatey Community Package Repository! The packages found in this section of the site are provided, maintained, and moderated by the community.
Moderation
Every version of each package undergoes a rigorous moderation process before it goes live that typically includes:
- Security, consistency, and quality checking
- Installation testing
- Virus checking through VirusTotal
- Human moderators who give final review and sign off
More detail at Security and Moderation.
Organizational Use
If you are an organization using Chocolatey, we want your experience to be fully reliable. Due to the nature of this publicly offered repository, reliability cannot be guaranteed. Packages offered here are subject to distribution rights, which means they may need to reach out further to the internet to the official locations to download files at runtime.
Fortunately, distribution rights do not apply for internal use. With any edition of Chocolatey (including the free open source edition), you can host your own packages and cache or internalize existing community packages.
Disclaimer
Your use of the packages on this site means you understand they are not supported or guaranteed in any way. Learn more...
-
STEP1
Package Review
-
STEP2
Integration Method
-
STEP3
Internal Repo Url
-
STEP4
Environment Setup
-
STEP5
Install Script
Step 1: Review Your Packages
Step 2: Choose Your Integration Method
Step 3: Enter Your Internal Repository Url
(this should look similar to https://community.chocolatey.org/api/v2/)
Step 3: Copy Your Script or Download Config
Option 1: Copy Script
Option 2: Download Config
Step 4: Setup Your Environment
1. Ensure you are set for organizational deployment
Please see the organizational deployment guide
2. Get the package into your environment
Option 1: Cached Package (Unreliable, Requires Internet - Same As Community)-
Open Source or Commercial:
- Proxy Repository - Create a proxy nuget repository on Nexus, Artifactory Pro, or a proxy Chocolatey repository on ProGet. Point your upstream to https://community.chocolatey.org/api/v2/. Packages cache on first access automatically. Make sure your choco clients are using your proxy repository as a source and NOT the default community repository. See source command for more information.
-
You can also just download the packages and push them to a repository
Download Packages
-
Open Source
-
Download the packages:
Download Packages - Follow manual internalization instructions
-
-
Package Internalizer (C4B)
-
Run: (additional options)
-
For package and dependencies run:
- Automate package internalization
-
Run: (additional options)
Step 5: Copy Your Script
See options you can pass to upgrade.
See best practices for scripting.
Add this to a PowerShell script or use a Batch script with tools and in places where you are calling directly to Chocolatey. If you are integrating, keep in mind enhanced exit codes.
If you do use a PowerShell script, use the following to ensure bad exit codes are shown as failures:
## 1. REQUIREMENTS ##
### Here are the requirements necessary to ensure this is successful.
### a. Internal/Private Cloud Repository Set Up ###
#### You'll need an internal/private cloud repository you can use. These are
#### generally really quick to set up and there are quite a few options.
#### Chocolatey Software recommends Nexus, Artifactory Pro, or ProGet as they
#### are repository servers and will give you the ability to manage multiple
#### repositories and types from one server installation.
### b. Download Chocolatey Package and Put on Internal Repository ###
#### You need to have downloaded the Chocolatey package as well.
#### Please see https://chocolatey.org/install#organization
### c. Other Requirements ###
#### We initialize a few things that are needed by this script - there are no other requirements.
$ErrorActionPreference = "Stop"
#### Set TLS 1.2 (3072) as that is the minimum required by various up-to-date repositories.
#### Use integers because the enumeration value for TLS 1.2 won't exist
#### in .NET 4.0, even though they are addressable if .NET 4.5+ is
#### installed (.NET 4.5 is an in-place upgrade).
[System.Net.ServicePointManager]::SecurityProtocol = [System.Net.ServicePointManager]::SecurityProtocol -bor 3072
#### We use this variable for future REST calls.
$RequestArguments = @{
UseBasicParsing = $true
}
## 2. TOP LEVEL VARIABLES ##
### a. Your internal repository url (the main one). ###
#### Should be similar to what you see when you browse
#### to https://community.chocolatey.org/api/v2/
$NugetRepositoryUrl = "INTERNAL REPO URL"
### b. Internal Repository Credential ###
#### If required, add the repository access credential here
# $NugetRepositoryCredential = [PSCredential]::new(
# "username",
# ("password" | ConvertTo-SecureString -AsPlainText -Force)
# )
# $RequestArguments.Credential = $NugetRepositoryCredential
### c. Chocolatey nupkg download url ###
#### This url should result in an immediate download when you navigate to it
$ChocolateyDownloadUrl = "$($NugetRepositoryUrl.TrimEnd('/'))/package/chocolatey.1.1.0.nupkg"
### d. Chocolatey Central Management (CCM) ###
#### If using CCM to manage Chocolatey, add the following:
#### i. Endpoint URL for CCM
# $ChocolateyCentralManagementUrl = "https://chocolatey-central-management:24020/ChocolateyManagementService"
#### ii. If using a Client Salt, add it here
# $ChocolateyCentralManagementClientSalt = "clientsalt"
#### iii. If using a Service Salt, add it here
# $ChocolateyCentralManagementServiceSalt = "servicesalt"
## 3. ENSURE CHOCOLATEY IS INSTALLED ##
### Ensure Chocolatey is installed from your internal repository
#### Download the Nupkg, appending .zip to the filename to handle archive cmdlet limitations
if (-not (Get-Command choco.exe -ErrorAction SilentlyContinue)) {
$TempDirectory = Join-Path $env:Temp "chocolateyInstall"
if (-not (Test-Path $TempDirectory -PathType Container)) {
$null = New-Item -Path $TempDirectory -ItemType Directory
}
$DownloadedNupkg = Join-Path $TempDirectory "$(Split-Path $ChocolateyDownloadUrl -Leaf).zip"
Invoke-WebRequest -Uri $ChocolateyDownloadUrl -OutFile $DownloadedNupkg @RequestArguments
#### Extract the Nupkg, and run the chocolateyInstall script
if (Get-Command Microsoft.PowerShell.Archive\Expand-Archive -ErrorAction SilentlyContinue) {
Microsoft.PowerShell.Archive\Expand-Archive -Path $DownloadedNupkg -DestinationPath $TempDirectory -Force
} else {
# PowerShell versions <4.0 do not have this function available
try {
$shellApplication = New-Object -ComObject Shell.Application
$zipPackage = $shellApplication.NameSpace($DownloadedNupkg)
$destinationFolder = $shellApplication.NameSpace($TempDirectory)
$destinationFolder.CopyHere($zipPackage.Items(), 0x10)
} catch {
Write-Warning "Unable to unzip package using built-in compression."
throw $_
}
}
& $(Join-Path $TempDirectory "tools\chocolateyInstall.ps1")
}
if (-not (Get-Command choco.exe -ErrorAction SilentlyContinue)) {
refreshenv
}
## 4. CONFIGURE CHOCOLATEY BASELINE ##
### a. FIPS Feature ###
#### If you need FIPS compliance - make this the first thing you configure
#### before you do any additional configuration or package installations
# choco feature enable -n useFipsCompliantChecksums
### b. Apply Recommended Configuration ###
#### Move cache location so Chocolatey is very deterministic about
#### cleaning up temporary data and the location is secured to admins
choco config set --name cacheLocation --value C:\ProgramData\chocolatey\cache
#### Increase timeout to at least 4 hours
choco config set --name commandExecutionTimeoutSeconds --value 14400
#### Turn off download progress when running choco through integrations
choco feature disable --name showDownloadProgress
### c. Sources ###
#### Remove the default community package repository source
choco source list --limitoutput | ConvertFrom-Csv -Header 'Name', 'Location' -Delimiter '|' | ForEach-Object {
if ($_.Location -eq 'https://community.chocolatey.org/api/v2/') {
choco source remove -n $_.Name
}
}
#### Add internal default sources
#### You could have multiple sources here, so we will provide an example
#### of one using the remote repo variable here
#### NOTE: This EXAMPLE may require changes
if ($NugetRepositoryCredential) {
choco source add --name ChocolateyInternal --source $NugetRepositoryUrl --user $NugetRepositoryCredential.UserName --password $NugetRepositoryCredential.GetNetworkCredential().Password --priority 1
} else {
choco source add --name ChocolateyInternal --source $NugetRepositoryUrl --priority 1
}
### b. Keep Chocolatey Up To Date ###
#### Keep chocolatey up to date based on your internal source
#### You control the upgrades based on when you push an updated version
#### to your internal repository.
#### Note the source here is to the OData feed, similar to what you see
#### when you browse to https://community.chocolatey.org/api/v2/
choco upgrade chocolatey --confirm
## 5. ENSURE CHOCOLATEY FOR BUSINESS ##
### If you don't have Chocolatey for Business (C4B), you'll want to remove from here down.
### a. Ensure The License File Is Installed ###
#### Create a license package using script from https://docs.chocolatey.org/en-us/how-tos/setup-offline-installation#exercise-4-create-a-package-for-the-license
choco install chocolatey-license --source $NugetRepositoryUrl --confirm
### b. Disable The Licensed Source ###
#### The licensed source cannot be removed, so it must be disabled.
#### This must occur after the license has been set by the license package.
if ("chocolatey-license" -in (choco list --localonly --limitoutput | ConvertFrom-Csv -Header "Name" -Delimiter "|").Name) {
choco source disable --name chocolatey.licensed
} else {
Write-Warning "Not disabling 'chocolatey.licensed' feed, as Chocolatey-License has not been installed."
}
### c. Ensure Chocolatey Licensed Extension ###
#### You will have downloaded the licensed extension to your internal repository
#### as you have disabled the licensed repository in step 5b.
#### Ensure the chocolatey.extension package (aka Chocolatey Licensed Extension)
if ("chocolatey-license" -in (choco list --localonly --limitoutput | ConvertFrom-Csv -Header "Name" -Delimiter "|").Name) {
choco install chocolatey.extension --source $NugetRepositoryUrl --confirm
} else {
Write-Warning "Not installing 'chocolatey.extension', as Chocolatey-License has not been installed."
}
#### The Chocolatey Licensed Extension unlocks all of the following, which also have configuration/feature items available with them. You may want to visit the feature pages to see what you might want to also enable:
#### - Package Builder - https://docs.chocolatey.org/en-us/features/paid/package-builder
#### - Package Internalizer - https://docs.chocolatey.org/en-us/features/paid/package-internalizer
#### - Package Synchronization (3 components) - https://docs.chocolatey.org/en-us/features/paid/package-synchronization
#### - Package Reducer - https://docs.chocolatey.org/en-us/features/paid/package-reducer
#### - Package Audit - https://docs.chocolatey.org/en-us/features/paid/package-audit
#### - Package Throttle - https://docs.chocolatey.org/en-us/features/paid/package-throttle
#### - CDN Cache Access - https://docs.chocolatey.org/en-us/features/paid/private-cdn
#### - Branding - https://docs.chocolatey.org/en-us/features/paid/branding
#### - Self-Service Anywhere (more components will need to be installed and additional configuration will need to be set) - https://docs.chocolatey.org/en-us/features/paid/self-service-anywhere
#### - Chocolatey Central Management (more components will need to be installed and additional configuration will need to be set) - https://docs.chocolatey.org/en-us/features/paid/chocolatey-central-management
#### - Other - https://docs.chocolatey.org/en-us/features/paid/
### d. Ensure Self-Service Anywhere ###
#### If you have desktop clients where users are not administrators, you may
#### to take advantage of deploying and configuring Self-Service anywhere
choco feature disable --name showNonElevatedWarnings
choco feature enable --name useBackgroundService
choco feature enable --name useBackgroundServiceWithNonAdministratorsOnly
choco feature enable --name allowBackgroundServiceUninstallsFromUserInstallsOnly
choco config set --name allowedBackgroundServiceCommands --value "install,upgrade,uninstall"
### e. Ensure Chocolatey Central Management ###
#### If you want to manage and report on endpoints, you can set up and configure
### Central Management. There are multiple portions to manage, so you'll see
### a section on agents here along with notes on how to configure the server
### side components.
if ($ChocolateyCentralManagementUrl) {
choco install chocolatey-agent --source $NugetRepositoryUrl --confirm
choco config set --name CentralManagementServiceUrl --value $ChocolateyCentralManagementUrl
if ($ChocolateyCentralManagementClientSalt) {
choco config set --name centralManagementClientCommunicationSaltAdditivePassword --value $ChocolateyCentralManagementClientSalt
}
if ($ChocolateyCentralManagementServiceSalt) {
choco config set --name centralManagementServiceCommunicationSaltAdditivePassword --value $ChocolateyCentralManagementServiceSalt
}
choco feature enable --name useChocolateyCentralManagement
choco feature enable --name useChocolateyCentralManagementDeployments
}
See docs at https://docs.ansible.com/ansible/latest/modules/win_chocolatey_module.html.
If Applicable - Chocolatey Configuration/Installation
## 1. REQUIREMENTS ##
### Here are the requirements necessary to ensure this is successful.
### a. Internal/Private Cloud Repository Set Up ###
#### You'll need an internal/private cloud repository you can use. These are
#### generally really quick to set up and there are quite a few options.
#### Chocolatey Software recommends Nexus, Artifactory Pro, or ProGet as they
#### are repository servers and will give you the ability to manage multiple
#### repositories and types from one server installation.
### b. Download Chocolatey Package and Put on Internal Repository ###
#### You need to have downloaded the Chocolatey package as well.
#### Please see https://chocolatey.org/install#organization
### c. Other Requirements ###
#### i. chocolatey.chocolatey
##### You will require the chocolatey.chocolatey collection to be installed
##### on all machines using this playbook.
##### Please see https://github.com/chocolatey/chocolatey-ansible/#installing-the-collection-from-ansible-galaxy
- name: Install and Configure Chocolatey
hosts: all
## 2. TOP LEVEL VARIABLES ##
vars:
### a. Your internal repository url (the main one). ###
#### Should be similar to what you see when you browse
#### to https://community.chocolatey.org/api/v2/
nuget_repository_url: INTERNAL REPO URL
### b. Internal Repository Credential ###
#### If required, add the repository access credential here and
#### uncomment lines with source_username and source_password below
# nuget_repository_username: username
# nuget_repository_password: password
### c. Chocolatey Central Management (CCM) ###
#### If using CCM to manage Chocolatey, add the following:
#### i. Endpoint URL for CCM
# chocolatey_central_management_url: https://chocolatey-central-management:24020/ChocolateyManagementService
#### ii. If using a Client Salt, add it here
# chocolatey_central_management_client_salt: clientsalt
#### iii. If using a Service Salt, add it here
# chocolatey_central_management_service_salt: servicesalt
## 3. ENSURE CHOCOLATEY IS INSTALLED ##
### Ensure Chocolatey is installed from your internal repository
tasks:
- name: Install chocolatey
win_chocolatey:
name: chocolatey
source: {{ nuget_repository_url }}
# source_username: {{ nuget_repository_username }}
# source_password: {{ nuget_repository_password }}
## 4. CONFIGURE CHOCOLATEY BASELINE ##
### a. FIPS Feature ###
#### If you need FIPS compliance - make this the first thing you configure
#### before you do any additional configuration or package installations
# - name: Enable FIPS compliance
# win_chocolatey_feature:
# name: useFipsCompliantChecksums
# state: enabled
### b. Apply Recommended Configuration ###
#### Move cache location so Chocolatey is very deterministic about
#### cleaning up temporary data and the location is secured to admins
- name: Set the cache location
win_chocolatey_config:
name: cacheLocation
state: present
value: C:\ProgramData\chocolatey\cache
#### Increase timeout to at least 4 hours
- name: Set the command execution timeout
win_chocolatey_config:
name: commandExecutionTimeoutSeconds
state: present
value: 14400
#### Turn off download progress when running choco through integrations
- name: Disable showing download progress
win_chocolatey_feature:
name: showDownloadProgress
state: disabled
### c. Sources ###
#### Remove the default community package repository source
- name: Remove Chocolatey Community Repository
win_chocolatey_source:
name: chocolatey
state: absent
#### Add internal default sources
#### You could have multiple sources here, so we will provide an example
#### of one using the remote repo variable here
#### NOTE: This EXAMPLE may require changes
- name: Add Internal Repository
win_chocolatey_source:
name: ChocolateyInternal
state: present
source: {{ nuget_repository_url }}
# source_username: {{ nuget_repository_username }}
# source_password: {{ nuget_repository_password }}
priority: 1
### b. Keep Chocolatey Up To Date ###
#### Keep chocolatey up to date based on your internal source
#### You control the upgrades based on when you push an updated version
#### to your internal repository.
#### Note the source here is to the OData feed, similar to what you see
#### when you browse to https://community.chocolatey.org/api/v2/
- name: Upgrade Chocolatey
win_chocolatey:
name: chocolatey
state: latest
## 5. ENSURE CHOCOLATEY FOR BUSINESS ##
### If you don't have Chocolatey for Business (C4B), you'll want to remove from here down.
### a. Ensure The License File Is Installed ###
#### Create a license package using script from https://docs.chocolatey.org/en-us/how-tos/setup-offline-installation#exercise-4-create-a-package-for-the-license
- name: Install Chocolatey License
win_chocolatey:
name: chocolatey-license
source: ChocolateyInternal
state: latest
### b. Disable The Licensed Source ###
#### The licensed source cannot be removed, so it must be disabled.
#### This must occur after the license has been set by the license package.
- name: Disable Chocolatey Community Repository
win_chocolatey_source:
name: chocolatey.licensed
state: disabled
### c. Ensure Chocolatey Licensed Extension ###
#### You will have downloaded the licensed extension to your internal repository
#### as you have disabled the licensed repository in step 5b.
#### Ensure the chocolatey.extension package (aka Chocolatey Licensed Extension)
- name: Install Chocolatey Extension
win_chocolatey:
name: chocolatey.extension
source: ChocolateyInternal
state: latest
#### The Chocolatey Licensed Extension unlocks all of the following, which also have configuration/feature items available with them. You may want to visit the feature pages to see what you might want to also enable:
#### - Package Builder - https://docs.chocolatey.org/en-us/features/paid/package-builder
#### - Package Internalizer - https://docs.chocolatey.org/en-us/features/paid/package-internalizer
#### - Package Synchronization (3 components) - https://docs.chocolatey.org/en-us/features/paid/package-synchronization
#### - Package Reducer - https://docs.chocolatey.org/en-us/features/paid/package-reducer
#### - Package Audit - https://docs.chocolatey.org/en-us/features/paid/package-audit
#### - Package Throttle - https://docs.chocolatey.org/en-us/features/paid/package-throttle
#### - CDN Cache Access - https://docs.chocolatey.org/en-us/features/paid/private-cdn
#### - Branding - https://docs.chocolatey.org/en-us/features/paid/branding
#### - Self-Service Anywhere (more components will need to be installed and additional configuration will need to be set) - https://docs.chocolatey.org/en-us/features/paid/self-service-anywhere
#### - Chocolatey Central Management (more components will need to be installed and additional configuration will need to be set) - https://docs.chocolatey.org/en-us/features/paid/chocolatey-central-management
#### - Other - https://docs.chocolatey.org/en-us/features/paid/
### d. Ensure Self-Service Anywhere ###
#### If you have desktop clients where users are not administrators, you may
#### to take advantage of deploying and configuring Self-Service anywhere
- name: Hide not-elevated warnings
win_chocolatey_feature:
name: showNonElevatedWarnings
state: disabled
- name: Use background mode for self-service
win_chocolatey_feature:
name: useBackgroundService
state: enabled
- name: Use background service for non-admins
win_chocolatey_feature:
name: useBackgroundServiceWithNonAdministratorsOnly
state: enabled
- name: Allow background uninstallation for user installs
win_chocolatey_feature:
name: allowBackgroundServiceUninstallsFromUserInstallsOnly
state: enabled
- name: Set allowed background service commands
win_chocolatey_config:
name: backgroundServiceAllowedCommands
state: present
value: install,upgrade,uninstall
### e. Ensure Chocolatey Central Management ###
#### If you want to manage and report on endpoints, you can set up and configure
### Central Management. There are multiple portions to manage, so you'll see
### a section on agents here along with notes on how to configure the server
### side components.
- name: Install Chocolatey Agent
when: chocolatey_central_management_url is defined
win_chocolatey:
name: chocolatey-agent
source: ChocolateyInternal
state: latest
- name: Set the Central Management Service URL
when: chocolatey_central_management_url is defined
win_chocolatey_config:
name: CentralManagementServiceUrl
state: present
value: {{ chocolatey_central_management_url }}
- name: Set the Central Management Client Salt
when: chocolatey_central_management_client_salt is defined
win_chocolatey_config:
name: centralManagementClientCommunicationSaltAdditivePassword
state: present
value: {{ chocolatey_central_management_client_salt }}
- name: Set the Central Management Service Salt
when: chocolatey_central_management_service_salt is defined
win_chocolatey_config:
name: centralManagementServiceCommunicationSaltAdditivePassword
state: present
value: {{ chocolatey_central_management_service_salt }}
- name: Use Central Management
when: chocolatey_central_management_url is defined
win_chocolatey_feature:
name: useChocolateyCentralManagement
state: enabled
- name: Use Central Management Deployments
when: chocolatey_central_management_url is defined
win_chocolatey_feature:
name: useChocolateyCentralManagementDeployments
state: enabled
See docs at https://docs.chef.io/resource_chocolatey_package.html.
If Applicable - Chocolatey Configuration/Installation
## 1. REQUIREMENTS ##
### Here are the requirements necessary to ensure this is successful.
### a. Internal/Private Cloud Repository Set Up ###
#### You'll need an internal/private cloud repository you can use. These are
#### generally really quick to set up and there are quite a few options.
#### Chocolatey Software recommends Nexus, Artifactory Pro, or ProGet as they
#### are repository servers and will give you the ability to manage multiple
#### repositories and types from one server installation.
### b. Download Chocolatey Package and Put on Internal Repository ###
#### You need to have downloaded the Chocolatey package as well.
#### Please see https://chocolatey.org/install#organization
### c. Other Requirements ###
#### The Chocolatey resources are available with any recent version of Chef.
#### We utilise the Chocolatey recipe to install the Chocolatey binaries.
include_recipe "chocolatey"
## 2. TOP LEVEL VARIABLES ##
### a. Your internal repository url (the main one). ###
#### Should be similar to what you see when you browse
#### to https://community.chocolatey.org/api/v2/
NugetRepositoryUrl = "INTERNAL REPO URL"
### b. Internal Repository Credential ###
#### If required, add the repository access credential here
# NugetRepositoryUsername = "username"
# NugetRepositoryPassword = "password"
### c. Chocolatey nupkg download url ###
#### This url should result in an immediate download when you navigate to it in
#### a web browser
ChocolateyNupkgUrl = "INTERNAL REPO URL/package/chocolatey.1.1.0.nupkg",
### d. Chocolatey Central Management (CCM) ###
#### If using CCM to manage Chocolatey, add the following:
#### i. Endpoint URL for CCM
# ChocolateyCentralManagementUrl = "https://chocolatey-central-management:24020/ChocolateyManagementService"
#### ii. If using a Client Salt, add it here
# ChocolateyCentralManagementClientSalt = "clientsalt"
#### iii. If using a Service Salt, add it here
# ChocolateyCentralManagementServiceSalt = "servicesalt"
## 3. ENSURE CHOCOLATEY IS INSTALLED ##
### Ensure Chocolatey is installed from your internal repository
node['chocolatey']['install vars'] = {
'chocolateyDownloadUrl' => "#{ChocolateyNupkgUrl}",
}
## 4. CONFIGURE CHOCOLATEY BASELINE ##
### a. FIPS Feature ###
#### If you need FIPS compliance - make this the first thing you configure
#### before you do any additional configuration or package installations
# chocolatey_feature 'useFipsCompliantChecksums' do
# action :enable
# end
### b. Apply Recommended Configuration ###
#### Move cache location so Chocolatey is very deterministic about
#### cleaning up temporary data and the location is secured to admins
chocolatey_config 'cacheLocation' do
value 'C:\ProgramData\chocolatey\cache'
end
#### Increase timeout to at least 4 hours
chocolatey_config 'commandExecutionTimeoutSeconds' do
value '14400'
end
#### Turn off download progress when running choco through integrations
chocolatey_feature 'showDownloadProgress' do
action :disable
end
### c. Sources ###
#### Remove the default community package repository source
chocolatey_source 'chocolatey' do
action :remove
end
#### Add internal default sources
#### You could have multiple sources here, so we will provide an example
#### of one using the remote repo variable here
#### NOTE: This EXAMPLE may require changes
chocolatey_source 'ChocolateyInternal' do
source "#{NugetRepositoryUrl}"
priority 1
action :add
end
execute 'ChocolateyInternal' do
command "choco source add --name ChocolateyInternal -s #{NugetRepositoryUrl} -u=#{NugetRepositoryUsername} -p=#{NugetRepositoryPassword} --priority=1"
only_if { NugetRepositoryUsername != nil || NugetRepositoryPassword != nil }
end
### b. Keep Chocolatey Up To Date ###
#### Keep chocolatey up to date based on your internal source
#### You control the upgrades based on when you push an updated version
#### to your internal repository.
#### Note the source here is to the OData feed, similar to what you see
#### when you browse to https://community.chocolatey.org/api/v2/
chocolatey_package 'chocolatey' do
action :upgrade
source "#{NugetRepositoryUrl}"
end
## 5. ENSURE CHOCOLATEY FOR BUSINESS ##
### If you don't have Chocolatey for Business (C4B), you'll want to remove from here down.
### a. Ensure The License File Is Installed ###
#### Create a license package using script from https://docs.chocolatey.org/en-us/how-tos/setup-offline-installation#exercise-4-create-a-package-for-the-license
chocolatey_package 'chocolatey-license' do
action :install
source "#{NugetRepositoryUrl}"
end
### b. Disable The Licensed Source ###
#### The licensed source cannot be removed, so it must be disabled.
#### This must occur after the license has been set by the license package.
chocolatey_source 'chocolatey.licensed' do
action :disable
end
### c. Ensure Chocolatey Licensed Extension ###
#### You will have downloaded the licensed extension to your internal repository
#### as you have disabled the licensed repository in step 5b.
#### Ensure the chocolatey.extension package (aka Chocolatey Licensed Extension)
chocolatey_package 'chocolatey.extention' do
action install
source "#{NugetRepositoryUrl}"
end
#### The Chocolatey Licensed Extension unlocks all of the following, which also have configuration/feature items available with them. You may want to visit the feature pages to see what you might want to also enable:
#### - Package Builder - https://docs.chocolatey.org/en-us/features/paid/package-builder
#### - Package Internalizer - https://docs.chocolatey.org/en-us/features/paid/package-internalizer
#### - Package Synchronization (3 components) - https://docs.chocolatey.org/en-us/features/paid/package-synchronization
#### - Package Reducer - https://docs.chocolatey.org/en-us/features/paid/package-reducer
#### - Package Audit - https://docs.chocolatey.org/en-us/features/paid/package-audit
#### - Package Throttle - https://docs.chocolatey.org/en-us/features/paid/package-throttle
#### - CDN Cache Access - https://docs.chocolatey.org/en-us/features/paid/private-cdn
#### - Branding - https://docs.chocolatey.org/en-us/features/paid/branding
#### - Self-Service Anywhere (more components will need to be installed and additional configuration will need to be set) - https://docs.chocolatey.org/en-us/features/paid/self-service-anywhere
#### - Chocolatey Central Management (more components will need to be installed and additional configuration will need to be set) - https://docs.chocolatey.org/en-us/features/paid/chocolatey-central-management
#### - Other - https://docs.chocolatey.org/en-us/features/paid/
### d. Ensure Self-Service Anywhere ###
#### If you have desktop clients where users are not administrators, you may
#### to take advantage of deploying and configuring Self-Service anywhere
chocolatey_feature 'showNonElevatedWarnings' do
action :disable
end
chocolatey_feature 'useBackgroundService' do
action :enable
end
chocolatey_feature 'useBackgroundServiceWithNonAdministratorsOnly' do
action :enable
end
chocolatey_feature 'allowBackgroundServiceUninstallsFromUserInstallsOnly' do
action :enable
end
chocolatey_config 'backgroundServiceAllowedCommands' do
value 'install,upgrade,uninstall'
end
### e. Ensure Chocolatey Central Management ###
#### If you want to manage and report on endpoints, you can set up and configure
### Central Management. There are multiple portions to manage, so you'll see
### a section on agents here along with notes on how to configure the server
### side components.
chocolatey_package 'chocolatey-agent' do
action install
source "#{NugetRepositoryUrl}"
# user "#{NugetRepositoryUsername}"
# password "#{NugetRepositoryPassword}"
only_if { ChocolateyCentralManagementUrl != nil }
end
chocolatey_config 'CentralManagementServiceUrl' do
value "#{ChocolateyCentralManagementUrl}"
only_if { ChocolateyCentralManagementUrl != nil }
end
chocolatey_config 'centralManagementClientCommunicationSaltAdditivePassword' do
value "#{ChocolateyCentralManagementClientSalt}"
only_if { ChocolateyCentralManagementClientSalt != nil }
end
chocolatey_config 'centralManagementServiceCommunicationSaltAdditivePassword' do
value "#{ChocolateyCentralManagementServiceSalt}"
only_if { ChocolateyCentralManagementServiceSalt != nil }
end
chocolatey_feature 'useChocolateyCentralManagement' do
action :enable
only_if { ChocolateyCentralManagementUrl != nil }
end
chocolatey_feature 'useChocolateyCentralManagementDeployments' do
action :enable
only_if { ChocolateyCentralManagementUrl != nil }
end
Requires cChoco DSC Resource. See docs at https://github.com/chocolatey/cChoco.
If Applicable - Chocolatey Configuration/Installation
#requires -Modules cChoco
## 1. REQUIREMENTS ##
### Here are the requirements necessary to ensure this is successful.
### a. Internal/Private Cloud Repository Set Up ###
#### You'll need an internal/private cloud repository you can use. These are
#### generally really quick to set up and there are quite a few options.
#### Chocolatey Software recommends Nexus, Artifactory Pro, or ProGet as they
#### are repository servers and will give you the ability to manage multiple
#### repositories and types from one server installation.
### b. Download Chocolatey Package and Put on Internal Repository ###
#### You need to have downloaded the Chocolatey package as well.
#### Please see https://chocolatey.org/install#organization
### c. Other Requirements ###
#### i. Requires chocolatey\cChoco DSC module to be installed on the machine compiling the DSC manifest
#### NOTE: This will need to be installed before running the DSC portion of this script
if (-not (Get-Module cChoco -ListAvailable)) {
$null = Install-PackageProvider -Name NuGet -MinimumVersion 2.8.5.201 -Force
if (($PSGallery = Get-PSRepository -Name PSGallery).InstallationPolicy -ne "Trusted") {
Set-PSRepository -Name PSGallery -InstallationPolicy Trusted
}
Install-Module -Name cChoco
if ($PSGallery.InstallationPolicy -ne "Trusted") {
Set-PSRepository -Name PSGallery -InstallationPolicy $PSGallery.InstallationPolicy
}
}
#### ii. Requires a hosted copy of the install.ps1 script
##### This should be available to download without authentication.
##### The original script can be found here: https://community.chocolatey.org/install.ps1
Configuration ChocolateyConfig {
## 2. TOP LEVEL VARIABLES ##
param(
### a. Your internal repository url (the main one). ###
#### Should be similar to what you see when you browse
#### to https://community.chocolatey.org/api/v2/
$NugetRepositoryUrl = "INTERNAL REPO URL",
### b. Chocolatey nupkg download url ###
#### This url should result in an immediate download when you navigate to it in
#### a web browser
$ChocolateyNupkgUrl = "INTERNAL REPO URL/package/chocolatey.1.1.0.nupkg",
### c. Internal Repository Credential ###
#### If required, add the repository access credential here
# $NugetRepositoryCredential = [PSCredential]::new(
# "username",
# ("password" | ConvertTo-SecureString -AsPlainText -Force)
# ),
### d. Install.ps1 URL
#### The path to the hosted install script:
$ChocolateyInstallPs1Url = "https://community.chocolatey.org/install.ps1"
### e. Chocolatey Central Management (CCM) ###
#### If using CCM to manage Chocolatey, add the following:
#### i. Endpoint URL for CCM
# $ChocolateyCentralManagementUrl = "https://chocolatey-central-management:24020/ChocolateyManagementService",
#### ii. If using a Client Salt, add it here
# $ChocolateyCentralManagementClientSalt = "clientsalt",
#### iii. If using a Service Salt, add it here
# $ChocolateyCentralManagementServiceSalt = "servicesalt"
)
Import-DscResource -ModuleName PSDesiredStateConfiguration
Import-DscResource -ModuleName cChoco
Node 'localhost' {
## 3. ENSURE CHOCOLATEY IS INSTALLED ##
### Ensure Chocolatey is installed from your internal repository
Environment chocoDownloadUrl {
Name = "chocolateyDownloadUrl"
Value = $ChocolateyNupkgUrl
}
cChocoInstaller installChocolatey {
DependsOn = "[Environment]chocoDownloadUrl"
InstallDir = Join-Path $env:ProgramData "chocolatey"
ChocoInstallScriptUrl = $ChocolateyInstallPs1Url
}
## 4. CONFIGURE CHOCOLATEY BASELINE ##
### a. FIPS Feature ###
#### If you need FIPS compliance - make this the first thing you configure
#### before you do any additional configuration or package installations
# cChocoFeature featureFipsCompliance {
# FeatureName = "useFipsCompliantChecksums"
# }
### b. Apply Recommended Configuration ###
#### Move cache location so Chocolatey is very deterministic about
#### cleaning up temporary data and the location is secured to admins
cChocoConfig cacheLocation {
DependsOn = "[cChocoInstaller]installChocolatey"
ConfigName = "cacheLocation"
Value = "C:\ProgramData\chocolatey\cache"
}
#### Increase timeout to at least 4 hours
cChocoConfig commandExecutionTimeoutSeconds {
DependsOn = "[cChocoInstaller]installChocolatey"
ConfigName = "commandExecutionTimeoutSeconds"
Value = 14400
}
#### Turn off download progress when running choco through integrations
cChocoFeature showDownloadProgress {
DependsOn = "[cChocoInstaller]installChocolatey"
FeatureName = "showDownloadProgress"
Ensure = "Absent"
}
### c. Sources ###
#### Remove the default community package repository source
cChocoSource removeCommunityRepository {
DependsOn = "[cChocoInstaller]installChocolatey"
Name = "chocolatey"
Ensure = "Absent"
}
#### Add internal default sources
#### You could have multiple sources here, so we will provide an example
#### of one using the remote repo variable here.
#### NOTE: This EXAMPLE may require changes
cChocoSource addInternalSource {
DependsOn = "[cChocoInstaller]installChocolatey"
Name = "ChocolateyInternal"
Source = $NugetRepositoryUrl
Credentials = $NugetRepositoryCredential
Priority = 1
}
### b. Keep Chocolatey Up To Date ###
#### Keep chocolatey up to date based on your internal source
#### You control the upgrades based on when you push an updated version
#### to your internal repository.
#### Note the source here is to the OData feed, similar to what you see
#### when you browse to https://community.chocolatey.org/api/v2/
cChocoPackageInstaller updateChocolatey {
DependsOn = "[cChocoSource]addInternalSource", "[cChocoSource]removeCommunityRepository"
Name = "chocolatey"
AutoUpgrade = $true
}
## 5. ENSURE CHOCOLATEY FOR BUSINESS ##
### If you don't have Chocolatey for Business (C4B), you'll want to remove from here down.
### a. Ensure The License File Is Installed ###
#### Create a license package using script from https://docs.chocolatey.org/en-us/how-tos/setup-offline-installation#exercise-4-create-a-package-for-the-license
cChocoPackageInstaller chocolateyLicense {
DependsOn = "[cChocoPackageInstaller]updateChocolatey"
Name = "chocolatey-license"
}
### b. Disable The Licensed Source ###
#### The licensed source cannot be removed, so it must be disabled.
#### This must occur after the license has been set by the license package.
Script disableLicensedSource {
DependsOn = "[cChocoPackageInstaller]chocolateyLicense"
GetScript = {
$Source = choco source list --limitoutput | `
ConvertFrom-Csv -Delimiter '|' -Header Name, Source, Disabled | `
Where-Object Name -eq "chocolatey.licensed"
return @{
Result = if ($Source) {
[bool]::Parse($Source.Disabled)
} else {
Write-Warning "Source 'chocolatey.licensed' was not present."
$true # Source does not need disabling
}
}
}
SetScript = {
$null = choco source disable --name "chocolatey.licensed"
}
TestScript = {
$State = [ScriptBlock]::Create($GetScript).Invoke()
return $State.Result
}
}
### c. Ensure Chocolatey Licensed Extension ###
#### You will have downloaded the licensed extension to your internal repository
#### as you have disabled the licensed repository in step 5b.
#### Ensure the chocolatey.extension package (aka Chocolatey Licensed Extension)
cChocoPackageInstaller chocolateyLicensedExtension {
DependsOn = "[Script]disableLicensedSource"
Name = "chocolatey.extension"
}
#### The Chocolatey Licensed Extension unlocks all of the following, which also have configuration/feature items available with them. You may want to visit the feature pages to see what you might want to also enable:
#### - Package Builder - https://docs.chocolatey.org/en-us/features/paid/package-builder
#### - Package Internalizer - https://docs.chocolatey.org/en-us/features/paid/package-internalizer
#### - Package Synchronization (3 components) - https://docs.chocolatey.org/en-us/features/paid/package-synchronization
#### - Package Reducer - https://docs.chocolatey.org/en-us/features/paid/package-reducer
#### - Package Audit - https://docs.chocolatey.org/en-us/features/paid/package-audit
#### - Package Throttle - https://docs.chocolatey.org/en-us/features/paid/package-throttle
#### - CDN Cache Access - https://docs.chocolatey.org/en-us/features/paid/private-cdn
#### - Branding - https://docs.chocolatey.org/en-us/features/paid/branding
#### - Self-Service Anywhere (more components will need to be installed and additional configuration will need to be set) - https://docs.chocolatey.org/en-us/features/paid/self-service-anywhere
#### - Chocolatey Central Management (more components will need to be installed and additional configuration will need to be set) - https://docs.chocolatey.org/en-us/features/paid/chocolatey-central-management
#### - Other - https://docs.chocolatey.org/en-us/features/paid/
### d. Ensure Self-Service Anywhere ###
#### If you have desktop clients where users are not administrators, you may
#### to take advantage of deploying and configuring Self-Service anywhere
cChocoFeature hideElevatedWarnings {
DependsOn = "[cChocoPackageInstaller]chocolateyLicensedExtension"
FeatureName = "showNonElevatedWarnings"
Ensure = "Absent"
}
cChocoFeature useBackgroundService {
DependsOn = "[cChocoPackageInstaller]chocolateyLicensedExtension"
FeatureName = "useBackgroundService"
Ensure = "Present"
}
cChocoFeature useBackgroundServiceWithNonAdmins {
DependsOn = "[cChocoPackageInstaller]chocolateyLicensedExtension"
FeatureName = "useBackgroundServiceWithNonAdministratorsOnly"
Ensure = "Present"
}
cChocoFeature useBackgroundServiceUninstallsForUserInstalls {
DependsOn = "[cChocoPackageInstaller]chocolateyLicensedExtension"
FeatureName = "allowBackgroundServiceUninstallsFromUserInstallsOnly"
Ensure = "Present"
}
cChocoConfig allowedBackgroundServiceCommands {
DependsOn = "[cChocoFeature]useBackgroundService"
ConfigName = "backgroundServiceAllowedCommands"
Value = "install,upgrade,uninstall"
}
### e. Ensure Chocolatey Central Management ###
#### If you want to manage and report on endpoints, you can set up and configure
### Central Management. There are multiple portions to manage, so you'll see
### a section on agents here along with notes on how to configure the server
### side components.
if ($ChocolateyCentralManagementUrl) {
cChocoPackageInstaller chocolateyAgent {
DependsOn = "[cChocoPackageInstaller]chocolateyLicensedExtension"
Name = "chocolatey-agent"
}
cChocoConfig centralManagementServiceUrl {
DependsOn = "[cChocoPackageInstaller]chocolateyAgent"
ConfigName = "CentralManagementServiceUrl"
Value = $ChocolateyCentralManagementUrl
}
if ($ChocolateyCentralManagementClientSalt) {
cChocoConfig centralManagementClientSalt {
DependsOn = "[cChocoPackageInstaller]chocolateyAgent"
ConfigName = "centralManagementClientCommunicationSaltAdditivePassword"
Value = $ChocolateyCentralManagementClientSalt
}
}
if ($ChocolateyCentralManagementServiceSalt) {
cChocoConfig centralManagementServiceSalt {
DependsOn = "[cChocoPackageInstaller]chocolateyAgent"
ConfigName = "centralManagementServiceCommunicationSaltAdditivePassword"
Value = $ChocolateyCentralManagementServiceSalt
}
}
cChocoFeature useCentralManagement {
DependsOn = "[cChocoPackageInstaller]chocolateyAgent"
FeatureName = "useChocolateyCentralManagement"
Ensure = "Present"
}
cChocoFeature useCentralManagementDeployments {
DependsOn = "[cChocoPackageInstaller]chocolateyAgent"
FeatureName = "useChocolateyCentralManagementDeployments"
Ensure = "Present"
}
}
}
}
# If working this into an existing configuration with a good method for
$ConfigData = @{
AllNodes = @(
@{
NodeName = "localhost"
PSDscAllowPlainTextPassword = $true
}
)
}
try {
Push-Location $env:Temp
$Config = ChocolateyConfig -ConfigurationData $ConfigData
Start-DscConfiguration -Path $Config.PSParentPath -Wait -Verbose -Force
} finally {
Pop-Location
}
Requires Puppet Chocolatey Provider module. See docs at https://forge.puppet.com/puppetlabs/chocolatey.
If Applicable - Chocolatey Configuration/Installation
## 1. REQUIREMENTS ##
### Here are the requirements necessary to ensure this is successful.
### a. Internal/Private Cloud Repository Set Up ###
#### You'll need an internal/private cloud repository you can use. These are
#### generally really quick to set up and there are quite a few options.
#### Chocolatey Software recommends Nexus, Artifactory Pro, or ProGet as they
#### are repository servers and will give you the ability to manage multiple
#### repositories and types from one server installation.
### b. Download Chocolatey Package and Put on Internal Repository ###
#### You need to have downloaded the Chocolatey package as well.
#### Please see https://chocolatey.org/install#organization
### c. Other Requirements ###
#### i. Requires puppetlabs/chocolatey module
#### See https://forge.puppet.com/puppetlabs/chocolatey
## 2. TOP LEVEL VARIABLES ##
### a. Your internal repository url (the main one). ###
#### Should be similar to what you see when you browse
#### to https://community.chocolatey.org/api/v2/
$_repository_url = 'INTERNAL REPO URL'
### b. Chocolatey nupkg download url ###
#### This url should result in an immediate download when you navigate to it in
#### a web browser
$_choco_download_url = 'INTERNAL REPO URL/package/chocolatey.1.1.0.nupkg'
### c. Chocolatey Central Management (CCM) ###
#### If using CCM to manage Chocolatey, add the following:
#### i. Endpoint URL for CCM
# $_chocolatey_central_management_url = 'https://chocolatey-central-management:24020/ChocolateyManagementService'
#### ii. If using a Client Salt, add it here
# $_chocolatey_central_management_client_salt = "clientsalt"
#### iii. If using a Service Salt, add it here
# $_chocolatey_central_management_service_salt = 'servicesalt'
## 3. ENSURE CHOCOLATEY IS INSTALLED ##
### Ensure Chocolatey is installed from your internal repository
### Note: `chocolatey_download_url is completely different than normal
### source locations. This is directly to the bare download url for the
### chocolatey.nupkg, similar to what you see when you browse to
### https://community.chocolatey.org/api/v2/package/chocolatey
class {'chocolatey':
chocolatey_download_url => $_choco_download_url,
use_7zip => false,
}
## 4. CONFIGURE CHOCOLATEY BASELINE ##
### a. FIPS Feature ###
#### If you need FIPS compliance - make this the first thing you configure
#### before you do any additional configuration or package installations
#chocolateyfeature {'useFipsCompliantChecksums':
# ensure => enabled,
#}
### b. Apply Recommended Configuration ###
#### Move cache location so Chocolatey is very deterministic about
#### cleaning up temporary data and the location is secured to admins
chocolateyconfig {'cacheLocation':
value => 'C:\ProgramData\chocolatey\cache',
}
#### Increase timeout to at least 4 hours
chocolateyconfig {'commandExecutionTimeoutSeconds':
value => '14400',
}
#### Turn off download progress when running choco through integrations
chocolateyfeature {'showDownloadProgress':
ensure => disabled,
}
### c. Sources ###
#### Remove the default community package repository source
chocolateysource {'chocolatey':
ensure => absent,
location => 'https://community.chocolatey.org/api/v2/',
}
#### Add internal default sources
#### You could have multiple sources here, so we will provide an example
#### of one using the remote repo variable here
#### NOTE: This EXAMPLE requires changes
chocolateysource {'internal_chocolatey':
ensure => present,
location => $_repository_url,
priority => 1,
username => 'optional',
password => 'optional,not ensured',
bypass_proxy => true,
admin_only => false,
allow_self_service => false,
}
### b. Keep Chocolatey Up To Date ###
#### Keep chocolatey up to date based on your internal source
#### You control the upgrades based on when you push an updated version
#### to your internal repository.
#### Note the source here is to the OData feed, similar to what you see
#### when you browse to https://community.chocolatey.org/api/v2/
package {'chocolatey':
ensure => latest,
provider => chocolatey,
source => $_repository_url,
}
## 5. ENSURE CHOCOLATEY FOR BUSINESS ##
### If you don't have Chocolatey for Business (C4B), you'll want to remove from here down.
### a. Ensure The License File Is Installed ###
#### Create a license package using script from https://docs.chocolatey.org/en-us/guides/organizations/organizational-deployment-guide#exercise-4-create-a-package-for-the-license
# TODO: Add resource for installing/ensuring the chocolatey-license package
package {'chocolatey-license':
ensure => latest,
provider => chocolatey,
source => $_repository_url,
}
### b. Disable The Licensed Source ###
#### The licensed source cannot be removed, so it must be disabled.
#### This must occur after the license has been set by the license package.
## Disabled sources still need all other attributes until
## https://tickets.puppetlabs.com/browse/MODULES-4449 is resolved.
## Password is necessary with user, but not ensurable, so it should not
## matter what it is set to here. If you ever do get into trouble here,
## the password is your license GUID.
chocolateysource {'chocolatey.licensed':
ensure => disabled,
priority => '10',
user => 'customer',
password => '1234',
require => Package['chocolatey-license'],
}
### c. Ensure Chocolatey Licensed Extension ###
#### You will have downloaded the licensed extension to your internal repository
#### as you have disabled the licensed repository in step 5b.
#### Ensure the chocolatey.extension package (aka Chocolatey Licensed Extension)
package {'chocolatey.extension':
ensure => latest,
provider => chocolatey,
source => $_repository_url,
require => Package['chocolatey-license'],
}
#### The Chocolatey Licensed Extension unlocks all of the following, which also have configuration/feature items available with them. You may want to visit the feature pages to see what you might want to also enable:
#### - Package Builder - https://docs.chocolatey.org/en-us/features/paid/package-builder
#### - Package Internalizer - https://docs.chocolatey.org/en-us/features/paid/package-internalizer
#### - Package Synchronization (3 components) - https://docs.chocolatey.org/en-us/features/paid/package-synchronization
#### - Package Reducer - https://docs.chocolatey.org/en-us/features/paid/package-reducer
#### - Package Audit - https://docs.chocolatey.org/en-us/features/paid/package-audit
#### - Package Throttle - https://docs.chocolatey.org/en-us/features/paid/package-throttle
#### - CDN Cache Access - https://docs.chocolatey.org/en-us/features/paid/private-cdn
#### - Branding - https://docs.chocolatey.org/en-us/features/paid/branding
#### - Self-Service Anywhere (more components will need to be installed and additional configuration will need to be set) - https://docs.chocolatey.org/en-us/features/paid/self-service-anywhere
#### - Chocolatey Central Management (more components will need to be installed and additional configuration will need to be set) - https://docs.chocolatey.org/en-us/features/paid/chocolatey-central-management
#### - Other - https://docs.chocolatey.org/en-us/features/paid/
### d. Ensure Self-Service Anywhere ###
#### If you have desktop clients where users are not administrators, you may
#### to take advantage of deploying and configuring Self-Service anywhere
chocolateyfeature {'showNonElevatedWarnings':
ensure => disabled,
}
chocolateyfeature {'useBackgroundService':
ensure => enabled,
}
chocolateyfeature {'useBackgroundServiceWithNonAdministratorsOnly':
ensure => enabled,
}
chocolateyfeature {'allowBackgroundServiceUninstallsFromUserInstallsOnly':
ensure => enabled,
}
chocolateyconfig {'backgroundServiceAllowedCommands':
value => 'install,upgrade,uninstall',
}
### e. Ensure Chocolatey Central Management ###
#### If you want to manage and report on endpoints, you can set up and configure
### Central Management. There are multiple portions to manage, so you'll see
### a section on agents here along with notes on how to configure the server
### side components.
if $_chocolatey_central_management_url {
package {'chocolatey-agent':
ensure => latest,
provider => chocolatey,
source => $_repository_url,
require => Package['chocolatey-license'],
}
chocolateyconfig {'CentralManagementServiceUrl':
value => $_chocolatey_central_management_url,
}
if $_chocolatey_central_management_client_salt {
chocolateyconfig {'centralManagementClientCommunicationSaltAdditivePassword':
value => $_chocolatey_central_management_client_salt,
}
}
if $_chocolatey_central_management_service_salt {
chocolateyconfig {'centralManagementClientCommunicationSaltAdditivePassword':
value => $_chocolatey_central_management_client_salt,
}
}
chocolateyfeature {'useChocolateyCentralManagement':
ensure => enabled,
require => Package['chocolatey-agent'],
}
chocolateyfeature {'useChocolateyCentralManagementDeployments':
ensure => enabled,
require => Package['chocolatey-agent'],
}
}
Need Help? View our docs or file an issue.
There is already a version of this package in your Script Builder
Current Version | New Version |
---|---|
- Passing
- Failing
- Pending
- Unknown / Exempted
Downloads:
293
Downloads of v 0.3.0:
54
Last Update:
25 Sep 2021
Package Maintainer(s):
Software Author(s):
- Rizin Organization
Tags:
rizin debugging security reverse-engineering program-analysis exploitation- Software Specific:
- Software Site
- Software Source
- Software License
- Software Docs
- Software Issues
- Package Specific:
- Package Source
- Package outdated?
- Package broken?
- Contact Maintainers
- Contact Site Admins
- Software Vendor?
- Report Abuse
- Download
rizin
This is not the latest version of rizin available.
- 1
- 2
- 3
0.3.0 | Updated: 25 Sep 2021
- Software Specific:
- Software Site
- Software Source
- Software License
- Software Docs
- Software Issues
- Package Specific:
- Package Source
- Package outdated?
- Package broken?
- Contact Maintainers
- Contact Site Admins
- Software Vendor?
- Report Abuse
- Download
Downloads:
293
Downloads of v 0.3.0:
54
Maintainer(s):
Software Author(s):
- Rizin Organization
Edit Package
To edit the metadata for a package, please upload an updated version of the package.
Chocolatey's Community Package Repository currently does not allow updating package metadata on the website. This helps ensure that the package itself (and the source used to build the package) remains the one true source of package metadata.
This does require that you increment the package version.
- 1
- 2
- 3
rizin
0.3.0
This is not the latest version of rizin available.
- 1
- 2
- 3
Some Checks Have Failed or Are Not Yet Complete
Not All Tests Have Passed
Deployment Method: Individual Install, Upgrade, & Uninstall
To install rizin, run the following command from the command line or from PowerShell:
To upgrade rizin, run the following command from the command line or from PowerShell:
To uninstall rizin, run the following command from the command line or from PowerShell:
Deployment Method:
📝 NOTE: This applies to both open source and commercial editions of Chocolatey.
1. Enter Your Internal Repository Url
(this should look similar to https://community.chocolatey.org/api/v2/)
2. Setup Your Environment
1. Ensure you are set for organizational deployment
Please see the organizational deployment guide
2. Get the package into your environment
Option 1: Cached Package (Unreliable, Requires Internet - Same As Community)-
Open Source or Commercial:
- Proxy Repository - Create a proxy nuget repository on Nexus, Artifactory Pro, or a proxy Chocolatey repository on ProGet. Point your upstream to https://community.chocolatey.org/api/v2/. Packages cache on first access automatically. Make sure your choco clients are using your proxy repository as a source and NOT the default community repository. See source command for more information.
- You can also just download the package and push it to a repository Download
-
Open Source
-
Download the package:
Download - Follow manual internalization instructions
-
-
Package Internalizer (C4B)
-
Run: (additional options)
choco download rizin --internalize --version=0.3.0 --source=https://community.chocolatey.org/api/v2/
-
For package and dependencies run:
choco push --source="'INTERNAL REPO URL'"
- Automate package internalization
-
Run: (additional options)
3. Copy Your Script
choco upgrade rizin -y --source="'INTERNAL REPO URL'" --version="'0.3.0'" [other options]
See options you can pass to upgrade.
See best practices for scripting.
Add this to a PowerShell script or use a Batch script with tools and in places where you are calling directly to Chocolatey. If you are integrating, keep in mind enhanced exit codes.
If you do use a PowerShell script, use the following to ensure bad exit codes are shown as failures:
choco upgrade rizin -y --source="'INTERNAL REPO URL'" --version="'0.3.0'"
$exitCode = $LASTEXITCODE
Write-Verbose "Exit code was $exitCode"
$validExitCodes = @(0, 1605, 1614, 1641, 3010)
if ($validExitCodes -contains $exitCode) {
Exit 0
}
Exit $exitCode
- name: Install rizin
win_chocolatey:
name: rizin
version: '0.3.0'
source: INTERNAL REPO URL
state: present
See docs at https://docs.ansible.com/ansible/latest/modules/win_chocolatey_module.html.
chocolatey_package 'rizin' do
action :install
source 'INTERNAL REPO URL'
version '0.3.0'
end
See docs at https://docs.chef.io/resource_chocolatey_package.html.
cChocoPackageInstaller rizin
{
Name = "rizin"
Version = "0.3.0"
Source = "INTERNAL REPO URL"
}
Requires cChoco DSC Resource. See docs at https://github.com/chocolatey/cChoco.
package { 'rizin':
ensure => '0.3.0',
provider => 'chocolatey',
source => 'INTERNAL REPO URL',
}
Requires Puppet Chocolatey Provider module. See docs at https://forge.puppet.com/puppetlabs/chocolatey.
4. If applicable - Chocolatey configuration/installation
See infrastructure management matrix for Chocolatey configuration elements and examples.
Private CDN cached downloads available for licensed customers. Never experience 404 breakages again! Learn more...
This package was approved by moderator TheCakeIsNaOH on 26 Sep 2021.
Rizin
Rizin is a fork of the radare2 reverse engineering framework with a focus on
usability, working features and code cleanliness.
Rizin is portable and it can be used to analyze binaries, disassemble code,
debug programs, as a forensics tool, as a scriptable command-line hexadecimal
editor able to open disk files, and much more!
To learn more on Rizin you may want to read the
official Rizin book.
Supported features
Supported Architectures
i386, x86-64, ARM, MIPS, PowerPC, SPARC, RISC-V, SH, m68k, m680x, AVR,
XAP, System Z, XCore, CR16, HPPA, ARC, Blackfin, Z80, H8/300, V810,
V850, CRIS, XAP, PIC, LM32, 8051, 6502, i4004, i8080, Propeller,
Tricore, CHIP-8, LH5801, T8200, GameBoy, SNES, SPC700, MSP430, Xtensa,
NIOS II, Java, Dalvik, WebAssembly, MSIL, EBC, TMS320 (c54x, c55x,
c55+, c66), Hexagon, Brainfuck, Malbolge, whitespace, DCPU16, LANAI,
MCORE, mcs96, RSP, SuperH-4, VAX, AMD Am29000.
Supported File Formats
ELF, Mach-O, Fatmach-O, PE, PE+, MZ, COFF, OMF, TE, XBE, BIOS/UEFI,
Dyldcache, DEX, ART, CGC, Java class, Android boot image, Plan9 executable,
ZIMG, MBN/SBL bootloader, ELF coredump, MDMP (Windows minidump),
WASM (WebAssembly binary), Commodore VICE emulator, QNX,
Game Boy (Advance), Nintendo DS ROMs and Nintendo 3DS FIRMs.
Scripting
We provide a way to interact with Rizin from Python, Haskell, OCaml,
Ruby, Rust, and Go languages through rzpipe.
Other languages although not currently supported could be easily added.
Community
Our website and blog: https://www.rizin.re/
Join our Mattermost community to discuss Rizin, its
development, and general topics related to the project.
We also provide the following partial bridges to other messaging platforms:
$ErrorActionPreference = 'Stop'
$version = 'v0.3.0'
$url = "https://github.com/rizinorg/rizin/releases/download/$version/rizin_installer-$version-x86.exe"
$url64 = "https://github.com/rizinorg/rizin/releases/download/$version/rizin_installer-$version-x86_64.exe"
$packageArgs = @{
packageName = $env:ChocolateyPackageName
unzipLocation = $env:ChocolateyPackageFolder
filetype = 'exe'
silentArgs = '/VERYSILENT /CURRENTUSER /NORESTART'
url = $url
url64bit = $url64
checksum = 'DF11C38902FBB07D45AFF36F64BD4D6143DA072C3239E67EDC3E5CE24AB016E7'
checksumType = 'sha256'
checksum64 = '68DED4368FBEBA1A2CEFC81AFCBB19FD0D3DEF8152A57354E92B746A31F5C1CF'
checksumType64 = 'sha256'
}
Install-ChocolateyPackage @packageArgs
Log in or click on link to see number of positives.
- rizin.0.3.0.nupkg (2f9c25bab4b7) - ## / 60
- rizin_installer-v0.3.0-x86_64.exe (68ded4368fbe) - ## / 68
- rizin_installer-v0.3.0-x86.exe (df11c38902fb) - ## / 68
In cases where actual malware is found, the packages are subject to removal. Software sometimes has false positives. Moderators do not necessarily validate the safety of the underlying software, only that a package retrieves software from the official distribution point and/or validate embedded software against official distribution point (where distribution rights allow redistribution).
Chocolatey Pro provides runtime protection from possible malware.
Add to Builder | Version | Downloads | Last Updated | Status |
---|---|---|---|---|
rizin 0.3.1 | 76 | Saturday, November 27, 2021 | Approved | |
rizin 0.3.0 | 54 | Saturday, September 25, 2021 | Approved | |
rizin 0.2.1 | 49 | Wednesday, August 25, 2021 | Approved | |
rizin 0.1.0 | 114 | Saturday, January 23, 2021 | Approved |
2021 rizin Rizin Organization
Rizin v0.3.0
A new release of Rizin is here, v0.3.0! This release has taken a bit longer than expected, but a lot of things have been done since the last release, including our first GSoC in the Rizin project. Look at our blogpost to know more about GSoC 2021.
Below we would like to give you a glimpse at what we did, but be aware this is only a small fraction of the changes. You should look at our git history to see everything. Some of our work directly improves our users' experience, while others is more under the hood work, though we are sure it ultimately improves the experience of using and developing Rizin as well.
Keep reading for some highlights of this new release.
New
- New RzType module: We moved all the types related functions from the RzAnalysis module to a new separate module: RzType. Instead of using a custom stripped-down version of the TinyCC, RzType parses C code by using a grammar defined with Tree-Sitter. RzType parser and loader now better validates types, which allowed us to fix several mistakes in the shipped type libraries for Linux, MacOS, and Windows. When a type is unknown or it is a typedef/atomic type without an underlying specification you may also find the special new type
unknown_t
which is an integer of the current file/platform word size. This new module allows us to better use types in several places of Rizin, Cutter and rz-ghidra! - SPDX headers: All files have been marked with SPDX headers that will help you and us check what kind of code we ship, which licenses, copyrights, etc.. Checks are in place in CI to ensure that all files will have SPDX headers going forward.
- rz-diff hexadecimal view: We rewrote big parts of rz-diff tool to remove the dependency on the
diff
/git diff
binary, optimize diffing functions and provide a new hexadecimal diffing view through the new-H
option.
- Shell new behavior: Rizin can now be started without any argument and it won't open any file, allowing you to later open a binary with
o
command as usual. We switched the behavior of-
and=
when starting Rizin, to better match what Linux users expect from a tool:-
now reads the binary from stdin, while=
now opens a malloc-ed file in memory. Try things withrizin
andrizin =
. - Global variables: So far you could only define variables local to a function (see
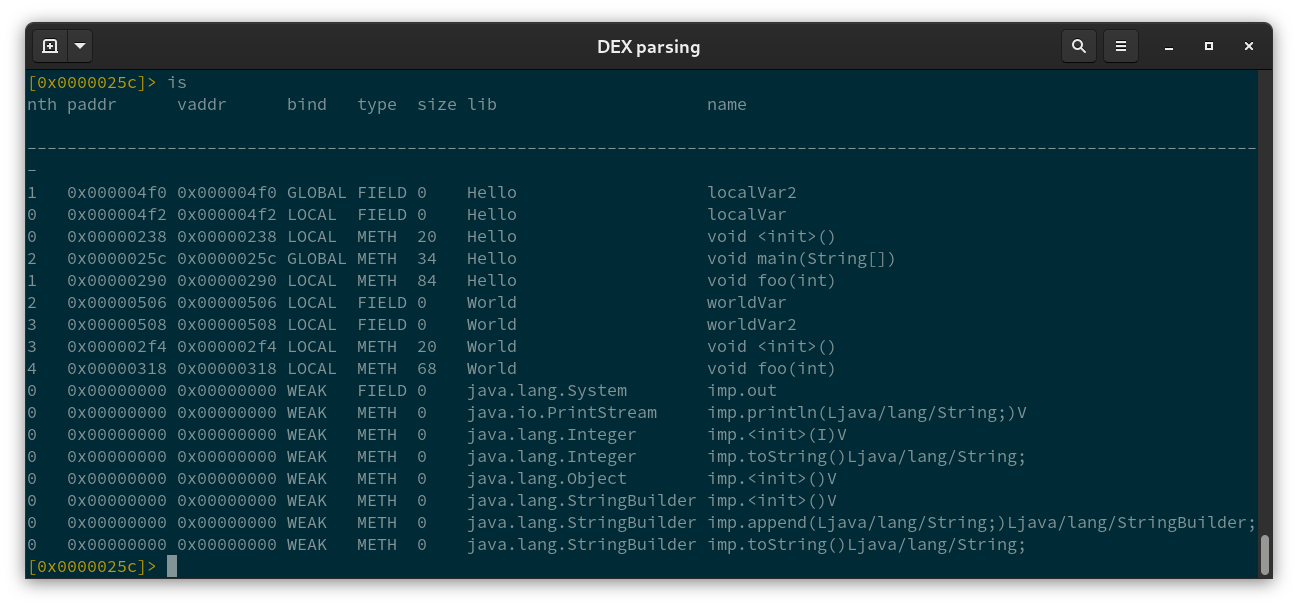
afv
commands), but we are now introducing global variables that can be defined at any fixed address with a given type. Seeavg?
to see how to handle them. This is still a very early concept, but we plan to use them more and more for disassembly printing, analysis, in Cutter, and in rz-ghidra. They are going to replace the “type link” function you may know under thetl
commands.
Improvements
- ELF parsing: Code for ELF parsing has been heavily refactored and adjusted to make better use of dynamic info provided in segments instead of relying on untrusted sections. Few new variables have been introduced to alter how ELF files should be parsed and validated, see
elf
vars withel elf
. Support for DT_HASH and DT_GNU_HASH allows to determine more accurately the number of symbols in the dynamic symbol table. As one of the results of this work, a known anti-analysis technique that tries to hide used symbols is now defeated by Rizin.
- No more io.cache required to apply relocations: It was common in Rizin to get warning messages telling you to enable
io.cache
to fix binary relocations. We think that was unnecessary and wrong in concept as well. With this new release, the most relevant binary plugins were refactored to provide a list of mappings together with changes that should be applied on top, making relocations patching very easy and transparent for the end user. You will not have to set any particular variable nor will you see changes applied by Rizin itself mixed with changes you, as a user, did to the binary.
- Commands ported to Rizin shell: Several commands were ported to Rizin unified shell, making them more consistent and easy to use. These commands have an automatically generated help, their arguments can be wrapped in quotes like you do in bash and they integrate better with Rizin. Some of those commands are:
afvxa
,afvxv
,dts
,L
,pg
,dmh
,dm
,pt
,dc
,H
,av
,ph
,avg
,i
,!
. - Project migration: With the first release of Rizin we mentioned our new project implementation which would allow our users to keep using older projects as they update their Rizin tools. Even though we are not at release 1.0.0 we already implemented project migrations that automatically update your old projects as you load them! Please report any issue you find with this, so that by the release 1.0.0 we can deliver something as stable as possible!
- Support for multidex APK files: Initial work to support multidex APK
- rz-hash: Code related to
rz-hash
was heavily refactored and it now supports loading of large files as well as HMAC combined with any hash algorithm.
Fixes
Fix debugger in static build: The statically compiled rizin binary provided with last release was not able to debug other binaries, due to it being compiled on Alpine and the code using the ptrace API with the wrong types of arguments.
FLIRT decompression: Did you know you could load IDA FLIRT signatures files in Rizin with the
zf
commands? Now we support z-lib compressed FLIRT signatures as well, so try to load your FLIRT database with Rizin.DEX parsing: Several bug fixes ranging from correctly listing symbols in a dex file, to better printing of methods and fields names, to resolution of invoke-virtual methods.
Ports: Added CI jobs for NetBSD and Linux PowerPC - all tests pass, various fixes for HaikuOS, DragonFlyBSD.
There is more in this release and even more to come in the upcoming ones, like a new Intermediate Language, RzIL, that will replace ESIL, improved usage of PDB files, global variables refinement and yet other improvements on ELF parsing. If you wish to help us develop, test, document Rizin or you are just curious about it, look at our website https://rizin.re/community/ to know how to reach out to us!
Enjoy Rizin v0.3.0,
The Rizin team
This package has no dependencies.
Ground Rules:
- This discussion is only about rizin and the rizin package. If you have feedback for Chocolatey, please contact the Google Group.
- This discussion will carry over multiple versions. If you have a comment about a particular version, please note that in your comments.
- The maintainers of this Chocolatey Package will be notified about new comments that are posted to this Disqus thread, however, it is NOT a guarantee that you will get a response. If you do not hear back from the maintainers after posting a message below, please follow up by using the link on the left side of this page or follow this link to contact maintainers. If you still hear nothing back, please follow the package triage process.
- Tell us what you love about the package or rizin, or tell us what needs improvement.
- Share your experiences with the package, or extra configuration or gotchas that you've found.
- If you use a url, the comment will be flagged for moderation until you've been whitelisted. Disqus moderated comments are approved on a weekly schedule if not sooner. It could take between 1-5 days for your comment to show up.