Welcome to the Chocolatey Community Package Repository! The packages found in this section of the site are provided, maintained, and moderated by the community.
Moderation
Every version of each package undergoes a rigorous moderation process before it goes live that typically includes:
- Security, consistency, and quality checking
- Installation testing
- Virus checking through VirusTotal
- Human moderators who give final review and sign off
More detail at Security and Moderation.
Organizational Use
If you are an organization using Chocolatey, we want your experience to be fully reliable. Due to the nature of this publicly offered repository, reliability cannot be guaranteed. Packages offered here are subject to distribution rights, which means they may need to reach out further to the internet to the official locations to download files at runtime.
Fortunately, distribution rights do not apply for internal use. With any edition of Chocolatey (including the free open source edition), you can host your own packages and cache or internalize existing community packages.
Disclaimer
Your use of the packages on this site means you understand they are not supported or guaranteed in any way. Learn more...
-
STEP1
Package Review
-
STEP2
Integration Method
-
STEP3
Internal Repo Url
-
STEP4
Environment Setup
-
STEP5
Install Script
Step 1: Review Your Packages
Step 2: Choose Your Integration Method
Step 3: Enter Your Internal Repository Url
(this should look similar to https://community.chocolatey.org/api/v2/)
Step 3: Copy Your Script or Download Config
Option 1: Copy Script
Option 2: Download Config
Step 4: Setup Your Environment
1. Ensure you are set for organizational deployment
Please see the organizational deployment guide
2. Get the package into your environment
Option 1: Cached Package (Unreliable, Requires Internet - Same As Community)-
Open Source or Commercial:
- Proxy Repository - Create a proxy nuget repository on Nexus, Artifactory Pro, or a proxy Chocolatey repository on ProGet. Point your upstream to https://community.chocolatey.org/api/v2/. Packages cache on first access automatically. Make sure your choco clients are using your proxy repository as a source and NOT the default community repository. See source command for more information.
-
You can also just download the packages and push them to a repository
Download Packages
-
Open Source
-
Download the packages:
Download Packages - Follow manual internalization instructions
-
-
Package Internalizer (C4B)
-
Run: (additional options)
-
For package and dependencies run:
- Automate package internalization
-
Run: (additional options)
Step 5: Copy Your Script
See options you can pass to upgrade.
See best practices for scripting.
Add this to a PowerShell script or use a Batch script with tools and in places where you are calling directly to Chocolatey. If you are integrating, keep in mind enhanced exit codes.
If you do use a PowerShell script, use the following to ensure bad exit codes are shown as failures:
## 1. REQUIREMENTS ##
### Here are the requirements necessary to ensure this is successful.
### a. Internal/Private Cloud Repository Set Up ###
#### You'll need an internal/private cloud repository you can use. These are
#### generally really quick to set up and there are quite a few options.
#### Chocolatey Software recommends Nexus, Artifactory Pro, or ProGet as they
#### are repository servers and will give you the ability to manage multiple
#### repositories and types from one server installation.
### b. Download Chocolatey Package and Put on Internal Repository ###
#### You need to have downloaded the Chocolatey package as well.
#### Please see https://chocolatey.org/install#organization
### c. Other Requirements ###
#### We initialize a few things that are needed by this script - there are no other requirements.
$ErrorActionPreference = "Stop"
#### Set TLS 1.2 (3072) as that is the minimum required by various up-to-date repositories.
#### Use integers because the enumeration value for TLS 1.2 won't exist
#### in .NET 4.0, even though they are addressable if .NET 4.5+ is
#### installed (.NET 4.5 is an in-place upgrade).
[System.Net.ServicePointManager]::SecurityProtocol = [System.Net.ServicePointManager]::SecurityProtocol -bor 3072
#### We use this variable for future REST calls.
$RequestArguments = @{
UseBasicParsing = $true
}
## 2. TOP LEVEL VARIABLES ##
### a. Your internal repository url (the main one). ###
#### Should be similar to what you see when you browse
#### to https://community.chocolatey.org/api/v2/
$NugetRepositoryUrl = "INTERNAL REPO URL"
### b. Internal Repository Credential ###
#### If required, add the repository access credential here
# $NugetRepositoryCredential = [PSCredential]::new(
# "username",
# ("password" | ConvertTo-SecureString -AsPlainText -Force)
# )
# $RequestArguments.Credential = $NugetRepositoryCredential
### c. Chocolatey nupkg download url ###
#### This url should result in an immediate download when you navigate to it
$ChocolateyDownloadUrl = "$($NugetRepositoryUrl.TrimEnd('/'))/package/chocolatey.1.1.0.nupkg"
### d. Chocolatey Central Management (CCM) ###
#### If using CCM to manage Chocolatey, add the following:
#### i. Endpoint URL for CCM
# $ChocolateyCentralManagementUrl = "https://chocolatey-central-management:24020/ChocolateyManagementService"
#### ii. If using a Client Salt, add it here
# $ChocolateyCentralManagementClientSalt = "clientsalt"
#### iii. If using a Service Salt, add it here
# $ChocolateyCentralManagementServiceSalt = "servicesalt"
## 3. ENSURE CHOCOLATEY IS INSTALLED ##
### Ensure Chocolatey is installed from your internal repository
#### Download the Nupkg, appending .zip to the filename to handle archive cmdlet limitations
if (-not (Get-Command choco.exe -ErrorAction SilentlyContinue)) {
$TempDirectory = Join-Path $env:Temp "chocolateyInstall"
if (-not (Test-Path $TempDirectory -PathType Container)) {
$null = New-Item -Path $TempDirectory -ItemType Directory
}
$DownloadedNupkg = Join-Path $TempDirectory "$(Split-Path $ChocolateyDownloadUrl -Leaf).zip"
Invoke-WebRequest -Uri $ChocolateyDownloadUrl -OutFile $DownloadedNupkg @RequestArguments
#### Extract the Nupkg, and run the chocolateyInstall script
if (Get-Command Microsoft.PowerShell.Archive\Expand-Archive -ErrorAction SilentlyContinue) {
Microsoft.PowerShell.Archive\Expand-Archive -Path $DownloadedNupkg -DestinationPath $TempDirectory -Force
} else {
# PowerShell versions <4.0 do not have this function available
try {
$shellApplication = New-Object -ComObject Shell.Application
$zipPackage = $shellApplication.NameSpace($DownloadedNupkg)
$destinationFolder = $shellApplication.NameSpace($TempDirectory)
$destinationFolder.CopyHere($zipPackage.Items(), 0x10)
} catch {
Write-Warning "Unable to unzip package using built-in compression."
throw $_
}
}
& $(Join-Path $TempDirectory "tools\chocolateyInstall.ps1")
}
if (-not (Get-Command choco.exe -ErrorAction SilentlyContinue)) {
refreshenv
}
## 4. CONFIGURE CHOCOLATEY BASELINE ##
### a. FIPS Feature ###
#### If you need FIPS compliance - make this the first thing you configure
#### before you do any additional configuration or package installations
# choco feature enable -n useFipsCompliantChecksums
### b. Apply Recommended Configuration ###
#### Move cache location so Chocolatey is very deterministic about
#### cleaning up temporary data and the location is secured to admins
choco config set --name cacheLocation --value C:\ProgramData\chocolatey\cache
#### Increase timeout to at least 4 hours
choco config set --name commandExecutionTimeoutSeconds --value 14400
#### Turn off download progress when running choco through integrations
choco feature disable --name showDownloadProgress
### c. Sources ###
#### Remove the default community package repository source
choco source list --limitoutput | ConvertFrom-Csv -Header 'Name', 'Location' -Delimiter '|' | ForEach-Object {
if ($_.Location -eq 'https://community.chocolatey.org/api/v2/') {
choco source remove -n $_.Name
}
}
#### Add internal default sources
#### You could have multiple sources here, so we will provide an example
#### of one using the remote repo variable here
#### NOTE: This EXAMPLE may require changes
if ($NugetRepositoryCredential) {
choco source add --name ChocolateyInternal --source $NugetRepositoryUrl --user $NugetRepositoryCredential.UserName --password $NugetRepositoryCredential.GetNetworkCredential().Password --priority 1
} else {
choco source add --name ChocolateyInternal --source $NugetRepositoryUrl --priority 1
}
### b. Keep Chocolatey Up To Date ###
#### Keep chocolatey up to date based on your internal source
#### You control the upgrades based on when you push an updated version
#### to your internal repository.
#### Note the source here is to the OData feed, similar to what you see
#### when you browse to https://community.chocolatey.org/api/v2/
choco upgrade chocolatey --confirm
## 5. ENSURE CHOCOLATEY FOR BUSINESS ##
### If you don't have Chocolatey for Business (C4B), you'll want to remove from here down.
### a. Ensure The License File Is Installed ###
#### Create a license package using script from https://docs.chocolatey.org/en-us/how-tos/setup-offline-installation#exercise-4-create-a-package-for-the-license
choco install chocolatey-license --source $NugetRepositoryUrl --confirm
### b. Disable The Licensed Source ###
#### The licensed source cannot be removed, so it must be disabled.
#### This must occur after the license has been set by the license package.
if ("chocolatey-license" -in (choco list --localonly --limitoutput | ConvertFrom-Csv -Header "Name" -Delimiter "|").Name) {
choco source disable --name chocolatey.licensed
} else {
Write-Warning "Not disabling 'chocolatey.licensed' feed, as Chocolatey-License has not been installed."
}
### c. Ensure Chocolatey Licensed Extension ###
#### You will have downloaded the licensed extension to your internal repository
#### as you have disabled the licensed repository in step 5b.
#### Ensure the chocolatey.extension package (aka Chocolatey Licensed Extension)
if ("chocolatey-license" -in (choco list --localonly --limitoutput | ConvertFrom-Csv -Header "Name" -Delimiter "|").Name) {
choco install chocolatey.extension --source $NugetRepositoryUrl --confirm
} else {
Write-Warning "Not installing 'chocolatey.extension', as Chocolatey-License has not been installed."
}
#### The Chocolatey Licensed Extension unlocks all of the following, which also have configuration/feature items available with them. You may want to visit the feature pages to see what you might want to also enable:
#### - Package Builder - https://docs.chocolatey.org/en-us/features/paid/package-builder
#### - Package Internalizer - https://docs.chocolatey.org/en-us/features/paid/package-internalizer
#### - Package Synchronization (3 components) - https://docs.chocolatey.org/en-us/features/paid/package-synchronization
#### - Package Reducer - https://docs.chocolatey.org/en-us/features/paid/package-reducer
#### - Package Audit - https://docs.chocolatey.org/en-us/features/paid/package-audit
#### - Package Throttle - https://docs.chocolatey.org/en-us/features/paid/package-throttle
#### - CDN Cache Access - https://docs.chocolatey.org/en-us/features/paid/private-cdn
#### - Branding - https://docs.chocolatey.org/en-us/features/paid/branding
#### - Self-Service Anywhere (more components will need to be installed and additional configuration will need to be set) - https://docs.chocolatey.org/en-us/features/paid/self-service-anywhere
#### - Chocolatey Central Management (more components will need to be installed and additional configuration will need to be set) - https://docs.chocolatey.org/en-us/features/paid/chocolatey-central-management
#### - Other - https://docs.chocolatey.org/en-us/features/paid/
### d. Ensure Self-Service Anywhere ###
#### If you have desktop clients where users are not administrators, you may
#### to take advantage of deploying and configuring Self-Service anywhere
choco feature disable --name showNonElevatedWarnings
choco feature enable --name useBackgroundService
choco feature enable --name useBackgroundServiceWithNonAdministratorsOnly
choco feature enable --name allowBackgroundServiceUninstallsFromUserInstallsOnly
choco config set --name allowedBackgroundServiceCommands --value "install,upgrade,uninstall"
### e. Ensure Chocolatey Central Management ###
#### If you want to manage and report on endpoints, you can set up and configure
### Central Management. There are multiple portions to manage, so you'll see
### a section on agents here along with notes on how to configure the server
### side components.
if ($ChocolateyCentralManagementUrl) {
choco install chocolatey-agent --source $NugetRepositoryUrl --confirm
choco config set --name CentralManagementServiceUrl --value $ChocolateyCentralManagementUrl
if ($ChocolateyCentralManagementClientSalt) {
choco config set --name centralManagementClientCommunicationSaltAdditivePassword --value $ChocolateyCentralManagementClientSalt
}
if ($ChocolateyCentralManagementServiceSalt) {
choco config set --name centralManagementServiceCommunicationSaltAdditivePassword --value $ChocolateyCentralManagementServiceSalt
}
choco feature enable --name useChocolateyCentralManagement
choco feature enable --name useChocolateyCentralManagementDeployments
}
See docs at https://docs.ansible.com/ansible/latest/modules/win_chocolatey_module.html.
If Applicable - Chocolatey Configuration/Installation
## 1. REQUIREMENTS ##
### Here are the requirements necessary to ensure this is successful.
### a. Internal/Private Cloud Repository Set Up ###
#### You'll need an internal/private cloud repository you can use. These are
#### generally really quick to set up and there are quite a few options.
#### Chocolatey Software recommends Nexus, Artifactory Pro, or ProGet as they
#### are repository servers and will give you the ability to manage multiple
#### repositories and types from one server installation.
### b. Download Chocolatey Package and Put on Internal Repository ###
#### You need to have downloaded the Chocolatey package as well.
#### Please see https://chocolatey.org/install#organization
### c. Other Requirements ###
#### i. chocolatey.chocolatey
##### You will require the chocolatey.chocolatey collection to be installed
##### on all machines using this playbook.
##### Please see https://github.com/chocolatey/chocolatey-ansible/#installing-the-collection-from-ansible-galaxy
- name: Install and Configure Chocolatey
hosts: all
## 2. TOP LEVEL VARIABLES ##
vars:
### a. Your internal repository url (the main one). ###
#### Should be similar to what you see when you browse
#### to https://community.chocolatey.org/api/v2/
nuget_repository_url: INTERNAL REPO URL
### b. Internal Repository Credential ###
#### If required, add the repository access credential here and
#### uncomment lines with source_username and source_password below
# nuget_repository_username: username
# nuget_repository_password: password
### c. Chocolatey Central Management (CCM) ###
#### If using CCM to manage Chocolatey, add the following:
#### i. Endpoint URL for CCM
# chocolatey_central_management_url: https://chocolatey-central-management:24020/ChocolateyManagementService
#### ii. If using a Client Salt, add it here
# chocolatey_central_management_client_salt: clientsalt
#### iii. If using a Service Salt, add it here
# chocolatey_central_management_service_salt: servicesalt
## 3. ENSURE CHOCOLATEY IS INSTALLED ##
### Ensure Chocolatey is installed from your internal repository
tasks:
- name: Install chocolatey
win_chocolatey:
name: chocolatey
source: {{ nuget_repository_url }}
# source_username: {{ nuget_repository_username }}
# source_password: {{ nuget_repository_password }}
## 4. CONFIGURE CHOCOLATEY BASELINE ##
### a. FIPS Feature ###
#### If you need FIPS compliance - make this the first thing you configure
#### before you do any additional configuration or package installations
# - name: Enable FIPS compliance
# win_chocolatey_feature:
# name: useFipsCompliantChecksums
# state: enabled
### b. Apply Recommended Configuration ###
#### Move cache location so Chocolatey is very deterministic about
#### cleaning up temporary data and the location is secured to admins
- name: Set the cache location
win_chocolatey_config:
name: cacheLocation
state: present
value: C:\ProgramData\chocolatey\cache
#### Increase timeout to at least 4 hours
- name: Set the command execution timeout
win_chocolatey_config:
name: commandExecutionTimeoutSeconds
state: present
value: 14400
#### Turn off download progress when running choco through integrations
- name: Disable showing download progress
win_chocolatey_feature:
name: showDownloadProgress
state: disabled
### c. Sources ###
#### Remove the default community package repository source
- name: Remove Chocolatey Community Repository
win_chocolatey_source:
name: chocolatey
state: absent
#### Add internal default sources
#### You could have multiple sources here, so we will provide an example
#### of one using the remote repo variable here
#### NOTE: This EXAMPLE may require changes
- name: Add Internal Repository
win_chocolatey_source:
name: ChocolateyInternal
state: present
source: {{ nuget_repository_url }}
# source_username: {{ nuget_repository_username }}
# source_password: {{ nuget_repository_password }}
priority: 1
### b. Keep Chocolatey Up To Date ###
#### Keep chocolatey up to date based on your internal source
#### You control the upgrades based on when you push an updated version
#### to your internal repository.
#### Note the source here is to the OData feed, similar to what you see
#### when you browse to https://community.chocolatey.org/api/v2/
- name: Upgrade Chocolatey
win_chocolatey:
name: chocolatey
state: latest
## 5. ENSURE CHOCOLATEY FOR BUSINESS ##
### If you don't have Chocolatey for Business (C4B), you'll want to remove from here down.
### a. Ensure The License File Is Installed ###
#### Create a license package using script from https://docs.chocolatey.org/en-us/how-tos/setup-offline-installation#exercise-4-create-a-package-for-the-license
- name: Install Chocolatey License
win_chocolatey:
name: chocolatey-license
source: ChocolateyInternal
state: latest
### b. Disable The Licensed Source ###
#### The licensed source cannot be removed, so it must be disabled.
#### This must occur after the license has been set by the license package.
- name: Disable Chocolatey Community Repository
win_chocolatey_source:
name: chocolatey.licensed
state: disabled
### c. Ensure Chocolatey Licensed Extension ###
#### You will have downloaded the licensed extension to your internal repository
#### as you have disabled the licensed repository in step 5b.
#### Ensure the chocolatey.extension package (aka Chocolatey Licensed Extension)
- name: Install Chocolatey Extension
win_chocolatey:
name: chocolatey.extension
source: ChocolateyInternal
state: latest
#### The Chocolatey Licensed Extension unlocks all of the following, which also have configuration/feature items available with them. You may want to visit the feature pages to see what you might want to also enable:
#### - Package Builder - https://docs.chocolatey.org/en-us/features/paid/package-builder
#### - Package Internalizer - https://docs.chocolatey.org/en-us/features/paid/package-internalizer
#### - Package Synchronization (3 components) - https://docs.chocolatey.org/en-us/features/paid/package-synchronization
#### - Package Reducer - https://docs.chocolatey.org/en-us/features/paid/package-reducer
#### - Package Audit - https://docs.chocolatey.org/en-us/features/paid/package-audit
#### - Package Throttle - https://docs.chocolatey.org/en-us/features/paid/package-throttle
#### - CDN Cache Access - https://docs.chocolatey.org/en-us/features/paid/private-cdn
#### - Branding - https://docs.chocolatey.org/en-us/features/paid/branding
#### - Self-Service Anywhere (more components will need to be installed and additional configuration will need to be set) - https://docs.chocolatey.org/en-us/features/paid/self-service-anywhere
#### - Chocolatey Central Management (more components will need to be installed and additional configuration will need to be set) - https://docs.chocolatey.org/en-us/features/paid/chocolatey-central-management
#### - Other - https://docs.chocolatey.org/en-us/features/paid/
### d. Ensure Self-Service Anywhere ###
#### If you have desktop clients where users are not administrators, you may
#### to take advantage of deploying and configuring Self-Service anywhere
- name: Hide not-elevated warnings
win_chocolatey_feature:
name: showNonElevatedWarnings
state: disabled
- name: Use background mode for self-service
win_chocolatey_feature:
name: useBackgroundService
state: enabled
- name: Use background service for non-admins
win_chocolatey_feature:
name: useBackgroundServiceWithNonAdministratorsOnly
state: enabled
- name: Allow background uninstallation for user installs
win_chocolatey_feature:
name: allowBackgroundServiceUninstallsFromUserInstallsOnly
state: enabled
- name: Set allowed background service commands
win_chocolatey_config:
name: backgroundServiceAllowedCommands
state: present
value: install,upgrade,uninstall
### e. Ensure Chocolatey Central Management ###
#### If you want to manage and report on endpoints, you can set up and configure
### Central Management. There are multiple portions to manage, so you'll see
### a section on agents here along with notes on how to configure the server
### side components.
- name: Install Chocolatey Agent
when: chocolatey_central_management_url is defined
win_chocolatey:
name: chocolatey-agent
source: ChocolateyInternal
state: latest
- name: Set the Central Management Service URL
when: chocolatey_central_management_url is defined
win_chocolatey_config:
name: CentralManagementServiceUrl
state: present
value: {{ chocolatey_central_management_url }}
- name: Set the Central Management Client Salt
when: chocolatey_central_management_client_salt is defined
win_chocolatey_config:
name: centralManagementClientCommunicationSaltAdditivePassword
state: present
value: {{ chocolatey_central_management_client_salt }}
- name: Set the Central Management Service Salt
when: chocolatey_central_management_service_salt is defined
win_chocolatey_config:
name: centralManagementServiceCommunicationSaltAdditivePassword
state: present
value: {{ chocolatey_central_management_service_salt }}
- name: Use Central Management
when: chocolatey_central_management_url is defined
win_chocolatey_feature:
name: useChocolateyCentralManagement
state: enabled
- name: Use Central Management Deployments
when: chocolatey_central_management_url is defined
win_chocolatey_feature:
name: useChocolateyCentralManagementDeployments
state: enabled
See docs at https://docs.chef.io/resource_chocolatey_package.html.
If Applicable - Chocolatey Configuration/Installation
## 1. REQUIREMENTS ##
### Here are the requirements necessary to ensure this is successful.
### a. Internal/Private Cloud Repository Set Up ###
#### You'll need an internal/private cloud repository you can use. These are
#### generally really quick to set up and there are quite a few options.
#### Chocolatey Software recommends Nexus, Artifactory Pro, or ProGet as they
#### are repository servers and will give you the ability to manage multiple
#### repositories and types from one server installation.
### b. Download Chocolatey Package and Put on Internal Repository ###
#### You need to have downloaded the Chocolatey package as well.
#### Please see https://chocolatey.org/install#organization
### c. Other Requirements ###
#### The Chocolatey resources are available with any recent version of Chef.
#### We utilise the Chocolatey recipe to install the Chocolatey binaries.
include_recipe "chocolatey"
## 2. TOP LEVEL VARIABLES ##
### a. Your internal repository url (the main one). ###
#### Should be similar to what you see when you browse
#### to https://community.chocolatey.org/api/v2/
NugetRepositoryUrl = "INTERNAL REPO URL"
### b. Internal Repository Credential ###
#### If required, add the repository access credential here
# NugetRepositoryUsername = "username"
# NugetRepositoryPassword = "password"
### c. Chocolatey nupkg download url ###
#### This url should result in an immediate download when you navigate to it in
#### a web browser
ChocolateyNupkgUrl = "INTERNAL REPO URL/package/chocolatey.1.1.0.nupkg",
### d. Chocolatey Central Management (CCM) ###
#### If using CCM to manage Chocolatey, add the following:
#### i. Endpoint URL for CCM
# ChocolateyCentralManagementUrl = "https://chocolatey-central-management:24020/ChocolateyManagementService"
#### ii. If using a Client Salt, add it here
# ChocolateyCentralManagementClientSalt = "clientsalt"
#### iii. If using a Service Salt, add it here
# ChocolateyCentralManagementServiceSalt = "servicesalt"
## 3. ENSURE CHOCOLATEY IS INSTALLED ##
### Ensure Chocolatey is installed from your internal repository
node['chocolatey']['install vars'] = {
'chocolateyDownloadUrl' => "#{ChocolateyNupkgUrl}",
}
## 4. CONFIGURE CHOCOLATEY BASELINE ##
### a. FIPS Feature ###
#### If you need FIPS compliance - make this the first thing you configure
#### before you do any additional configuration or package installations
# chocolatey_feature 'useFipsCompliantChecksums' do
# action :enable
# end
### b. Apply Recommended Configuration ###
#### Move cache location so Chocolatey is very deterministic about
#### cleaning up temporary data and the location is secured to admins
chocolatey_config 'cacheLocation' do
value 'C:\ProgramData\chocolatey\cache'
end
#### Increase timeout to at least 4 hours
chocolatey_config 'commandExecutionTimeoutSeconds' do
value '14400'
end
#### Turn off download progress when running choco through integrations
chocolatey_feature 'showDownloadProgress' do
action :disable
end
### c. Sources ###
#### Remove the default community package repository source
chocolatey_source 'chocolatey' do
action :remove
end
#### Add internal default sources
#### You could have multiple sources here, so we will provide an example
#### of one using the remote repo variable here
#### NOTE: This EXAMPLE may require changes
chocolatey_source 'ChocolateyInternal' do
source "#{NugetRepositoryUrl}"
priority 1
action :add
end
execute 'ChocolateyInternal' do
command "choco source add --name ChocolateyInternal -s #{NugetRepositoryUrl} -u=#{NugetRepositoryUsername} -p=#{NugetRepositoryPassword} --priority=1"
only_if { NugetRepositoryUsername != nil || NugetRepositoryPassword != nil }
end
### b. Keep Chocolatey Up To Date ###
#### Keep chocolatey up to date based on your internal source
#### You control the upgrades based on when you push an updated version
#### to your internal repository.
#### Note the source here is to the OData feed, similar to what you see
#### when you browse to https://community.chocolatey.org/api/v2/
chocolatey_package 'chocolatey' do
action :upgrade
source "#{NugetRepositoryUrl}"
end
## 5. ENSURE CHOCOLATEY FOR BUSINESS ##
### If you don't have Chocolatey for Business (C4B), you'll want to remove from here down.
### a. Ensure The License File Is Installed ###
#### Create a license package using script from https://docs.chocolatey.org/en-us/how-tos/setup-offline-installation#exercise-4-create-a-package-for-the-license
chocolatey_package 'chocolatey-license' do
action :install
source "#{NugetRepositoryUrl}"
end
### b. Disable The Licensed Source ###
#### The licensed source cannot be removed, so it must be disabled.
#### This must occur after the license has been set by the license package.
chocolatey_source 'chocolatey.licensed' do
action :disable
end
### c. Ensure Chocolatey Licensed Extension ###
#### You will have downloaded the licensed extension to your internal repository
#### as you have disabled the licensed repository in step 5b.
#### Ensure the chocolatey.extension package (aka Chocolatey Licensed Extension)
chocolatey_package 'chocolatey.extention' do
action install
source "#{NugetRepositoryUrl}"
end
#### The Chocolatey Licensed Extension unlocks all of the following, which also have configuration/feature items available with them. You may want to visit the feature pages to see what you might want to also enable:
#### - Package Builder - https://docs.chocolatey.org/en-us/features/paid/package-builder
#### - Package Internalizer - https://docs.chocolatey.org/en-us/features/paid/package-internalizer
#### - Package Synchronization (3 components) - https://docs.chocolatey.org/en-us/features/paid/package-synchronization
#### - Package Reducer - https://docs.chocolatey.org/en-us/features/paid/package-reducer
#### - Package Audit - https://docs.chocolatey.org/en-us/features/paid/package-audit
#### - Package Throttle - https://docs.chocolatey.org/en-us/features/paid/package-throttle
#### - CDN Cache Access - https://docs.chocolatey.org/en-us/features/paid/private-cdn
#### - Branding - https://docs.chocolatey.org/en-us/features/paid/branding
#### - Self-Service Anywhere (more components will need to be installed and additional configuration will need to be set) - https://docs.chocolatey.org/en-us/features/paid/self-service-anywhere
#### - Chocolatey Central Management (more components will need to be installed and additional configuration will need to be set) - https://docs.chocolatey.org/en-us/features/paid/chocolatey-central-management
#### - Other - https://docs.chocolatey.org/en-us/features/paid/
### d. Ensure Self-Service Anywhere ###
#### If you have desktop clients where users are not administrators, you may
#### to take advantage of deploying and configuring Self-Service anywhere
chocolatey_feature 'showNonElevatedWarnings' do
action :disable
end
chocolatey_feature 'useBackgroundService' do
action :enable
end
chocolatey_feature 'useBackgroundServiceWithNonAdministratorsOnly' do
action :enable
end
chocolatey_feature 'allowBackgroundServiceUninstallsFromUserInstallsOnly' do
action :enable
end
chocolatey_config 'backgroundServiceAllowedCommands' do
value 'install,upgrade,uninstall'
end
### e. Ensure Chocolatey Central Management ###
#### If you want to manage and report on endpoints, you can set up and configure
### Central Management. There are multiple portions to manage, so you'll see
### a section on agents here along with notes on how to configure the server
### side components.
chocolatey_package 'chocolatey-agent' do
action install
source "#{NugetRepositoryUrl}"
# user "#{NugetRepositoryUsername}"
# password "#{NugetRepositoryPassword}"
only_if { ChocolateyCentralManagementUrl != nil }
end
chocolatey_config 'CentralManagementServiceUrl' do
value "#{ChocolateyCentralManagementUrl}"
only_if { ChocolateyCentralManagementUrl != nil }
end
chocolatey_config 'centralManagementClientCommunicationSaltAdditivePassword' do
value "#{ChocolateyCentralManagementClientSalt}"
only_if { ChocolateyCentralManagementClientSalt != nil }
end
chocolatey_config 'centralManagementServiceCommunicationSaltAdditivePassword' do
value "#{ChocolateyCentralManagementServiceSalt}"
only_if { ChocolateyCentralManagementServiceSalt != nil }
end
chocolatey_feature 'useChocolateyCentralManagement' do
action :enable
only_if { ChocolateyCentralManagementUrl != nil }
end
chocolatey_feature 'useChocolateyCentralManagementDeployments' do
action :enable
only_if { ChocolateyCentralManagementUrl != nil }
end
Requires cChoco DSC Resource. See docs at https://github.com/chocolatey/cChoco.
If Applicable - Chocolatey Configuration/Installation
#requires -Modules cChoco
## 1. REQUIREMENTS ##
### Here are the requirements necessary to ensure this is successful.
### a. Internal/Private Cloud Repository Set Up ###
#### You'll need an internal/private cloud repository you can use. These are
#### generally really quick to set up and there are quite a few options.
#### Chocolatey Software recommends Nexus, Artifactory Pro, or ProGet as they
#### are repository servers and will give you the ability to manage multiple
#### repositories and types from one server installation.
### b. Download Chocolatey Package and Put on Internal Repository ###
#### You need to have downloaded the Chocolatey package as well.
#### Please see https://chocolatey.org/install#organization
### c. Other Requirements ###
#### i. Requires chocolatey\cChoco DSC module to be installed on the machine compiling the DSC manifest
#### NOTE: This will need to be installed before running the DSC portion of this script
if (-not (Get-Module cChoco -ListAvailable)) {
$null = Install-PackageProvider -Name NuGet -MinimumVersion 2.8.5.201 -Force
if (($PSGallery = Get-PSRepository -Name PSGallery).InstallationPolicy -ne "Trusted") {
Set-PSRepository -Name PSGallery -InstallationPolicy Trusted
}
Install-Module -Name cChoco
if ($PSGallery.InstallationPolicy -ne "Trusted") {
Set-PSRepository -Name PSGallery -InstallationPolicy $PSGallery.InstallationPolicy
}
}
#### ii. Requires a hosted copy of the install.ps1 script
##### This should be available to download without authentication.
##### The original script can be found here: https://community.chocolatey.org/install.ps1
Configuration ChocolateyConfig {
## 2. TOP LEVEL VARIABLES ##
param(
### a. Your internal repository url (the main one). ###
#### Should be similar to what you see when you browse
#### to https://community.chocolatey.org/api/v2/
$NugetRepositoryUrl = "INTERNAL REPO URL",
### b. Chocolatey nupkg download url ###
#### This url should result in an immediate download when you navigate to it in
#### a web browser
$ChocolateyNupkgUrl = "INTERNAL REPO URL/package/chocolatey.1.1.0.nupkg",
### c. Internal Repository Credential ###
#### If required, add the repository access credential here
# $NugetRepositoryCredential = [PSCredential]::new(
# "username",
# ("password" | ConvertTo-SecureString -AsPlainText -Force)
# ),
### d. Install.ps1 URL
#### The path to the hosted install script:
$ChocolateyInstallPs1Url = "https://community.chocolatey.org/install.ps1"
### e. Chocolatey Central Management (CCM) ###
#### If using CCM to manage Chocolatey, add the following:
#### i. Endpoint URL for CCM
# $ChocolateyCentralManagementUrl = "https://chocolatey-central-management:24020/ChocolateyManagementService",
#### ii. If using a Client Salt, add it here
# $ChocolateyCentralManagementClientSalt = "clientsalt",
#### iii. If using a Service Salt, add it here
# $ChocolateyCentralManagementServiceSalt = "servicesalt"
)
Import-DscResource -ModuleName PSDesiredStateConfiguration
Import-DscResource -ModuleName cChoco
Node 'localhost' {
## 3. ENSURE CHOCOLATEY IS INSTALLED ##
### Ensure Chocolatey is installed from your internal repository
Environment chocoDownloadUrl {
Name = "chocolateyDownloadUrl"
Value = $ChocolateyNupkgUrl
}
cChocoInstaller installChocolatey {
DependsOn = "[Environment]chocoDownloadUrl"
InstallDir = Join-Path $env:ProgramData "chocolatey"
ChocoInstallScriptUrl = $ChocolateyInstallPs1Url
}
## 4. CONFIGURE CHOCOLATEY BASELINE ##
### a. FIPS Feature ###
#### If you need FIPS compliance - make this the first thing you configure
#### before you do any additional configuration or package installations
# cChocoFeature featureFipsCompliance {
# FeatureName = "useFipsCompliantChecksums"
# }
### b. Apply Recommended Configuration ###
#### Move cache location so Chocolatey is very deterministic about
#### cleaning up temporary data and the location is secured to admins
cChocoConfig cacheLocation {
DependsOn = "[cChocoInstaller]installChocolatey"
ConfigName = "cacheLocation"
Value = "C:\ProgramData\chocolatey\cache"
}
#### Increase timeout to at least 4 hours
cChocoConfig commandExecutionTimeoutSeconds {
DependsOn = "[cChocoInstaller]installChocolatey"
ConfigName = "commandExecutionTimeoutSeconds"
Value = 14400
}
#### Turn off download progress when running choco through integrations
cChocoFeature showDownloadProgress {
DependsOn = "[cChocoInstaller]installChocolatey"
FeatureName = "showDownloadProgress"
Ensure = "Absent"
}
### c. Sources ###
#### Remove the default community package repository source
cChocoSource removeCommunityRepository {
DependsOn = "[cChocoInstaller]installChocolatey"
Name = "chocolatey"
Ensure = "Absent"
}
#### Add internal default sources
#### You could have multiple sources here, so we will provide an example
#### of one using the remote repo variable here.
#### NOTE: This EXAMPLE may require changes
cChocoSource addInternalSource {
DependsOn = "[cChocoInstaller]installChocolatey"
Name = "ChocolateyInternal"
Source = $NugetRepositoryUrl
Credentials = $NugetRepositoryCredential
Priority = 1
}
### b. Keep Chocolatey Up To Date ###
#### Keep chocolatey up to date based on your internal source
#### You control the upgrades based on when you push an updated version
#### to your internal repository.
#### Note the source here is to the OData feed, similar to what you see
#### when you browse to https://community.chocolatey.org/api/v2/
cChocoPackageInstaller updateChocolatey {
DependsOn = "[cChocoSource]addInternalSource", "[cChocoSource]removeCommunityRepository"
Name = "chocolatey"
AutoUpgrade = $true
}
## 5. ENSURE CHOCOLATEY FOR BUSINESS ##
### If you don't have Chocolatey for Business (C4B), you'll want to remove from here down.
### a. Ensure The License File Is Installed ###
#### Create a license package using script from https://docs.chocolatey.org/en-us/how-tos/setup-offline-installation#exercise-4-create-a-package-for-the-license
cChocoPackageInstaller chocolateyLicense {
DependsOn = "[cChocoPackageInstaller]updateChocolatey"
Name = "chocolatey-license"
}
### b. Disable The Licensed Source ###
#### The licensed source cannot be removed, so it must be disabled.
#### This must occur after the license has been set by the license package.
Script disableLicensedSource {
DependsOn = "[cChocoPackageInstaller]chocolateyLicense"
GetScript = {
$Source = choco source list --limitoutput | `
ConvertFrom-Csv -Delimiter '|' -Header Name, Source, Disabled | `
Where-Object Name -eq "chocolatey.licensed"
return @{
Result = if ($Source) {
[bool]::Parse($Source.Disabled)
} else {
Write-Warning "Source 'chocolatey.licensed' was not present."
$true # Source does not need disabling
}
}
}
SetScript = {
$null = choco source disable --name "chocolatey.licensed"
}
TestScript = {
$State = [ScriptBlock]::Create($GetScript).Invoke()
return $State.Result
}
}
### c. Ensure Chocolatey Licensed Extension ###
#### You will have downloaded the licensed extension to your internal repository
#### as you have disabled the licensed repository in step 5b.
#### Ensure the chocolatey.extension package (aka Chocolatey Licensed Extension)
cChocoPackageInstaller chocolateyLicensedExtension {
DependsOn = "[Script]disableLicensedSource"
Name = "chocolatey.extension"
}
#### The Chocolatey Licensed Extension unlocks all of the following, which also have configuration/feature items available with them. You may want to visit the feature pages to see what you might want to also enable:
#### - Package Builder - https://docs.chocolatey.org/en-us/features/paid/package-builder
#### - Package Internalizer - https://docs.chocolatey.org/en-us/features/paid/package-internalizer
#### - Package Synchronization (3 components) - https://docs.chocolatey.org/en-us/features/paid/package-synchronization
#### - Package Reducer - https://docs.chocolatey.org/en-us/features/paid/package-reducer
#### - Package Audit - https://docs.chocolatey.org/en-us/features/paid/package-audit
#### - Package Throttle - https://docs.chocolatey.org/en-us/features/paid/package-throttle
#### - CDN Cache Access - https://docs.chocolatey.org/en-us/features/paid/private-cdn
#### - Branding - https://docs.chocolatey.org/en-us/features/paid/branding
#### - Self-Service Anywhere (more components will need to be installed and additional configuration will need to be set) - https://docs.chocolatey.org/en-us/features/paid/self-service-anywhere
#### - Chocolatey Central Management (more components will need to be installed and additional configuration will need to be set) - https://docs.chocolatey.org/en-us/features/paid/chocolatey-central-management
#### - Other - https://docs.chocolatey.org/en-us/features/paid/
### d. Ensure Self-Service Anywhere ###
#### If you have desktop clients where users are not administrators, you may
#### to take advantage of deploying and configuring Self-Service anywhere
cChocoFeature hideElevatedWarnings {
DependsOn = "[cChocoPackageInstaller]chocolateyLicensedExtension"
FeatureName = "showNonElevatedWarnings"
Ensure = "Absent"
}
cChocoFeature useBackgroundService {
DependsOn = "[cChocoPackageInstaller]chocolateyLicensedExtension"
FeatureName = "useBackgroundService"
Ensure = "Present"
}
cChocoFeature useBackgroundServiceWithNonAdmins {
DependsOn = "[cChocoPackageInstaller]chocolateyLicensedExtension"
FeatureName = "useBackgroundServiceWithNonAdministratorsOnly"
Ensure = "Present"
}
cChocoFeature useBackgroundServiceUninstallsForUserInstalls {
DependsOn = "[cChocoPackageInstaller]chocolateyLicensedExtension"
FeatureName = "allowBackgroundServiceUninstallsFromUserInstallsOnly"
Ensure = "Present"
}
cChocoConfig allowedBackgroundServiceCommands {
DependsOn = "[cChocoFeature]useBackgroundService"
ConfigName = "backgroundServiceAllowedCommands"
Value = "install,upgrade,uninstall"
}
### e. Ensure Chocolatey Central Management ###
#### If you want to manage and report on endpoints, you can set up and configure
### Central Management. There are multiple portions to manage, so you'll see
### a section on agents here along with notes on how to configure the server
### side components.
if ($ChocolateyCentralManagementUrl) {
cChocoPackageInstaller chocolateyAgent {
DependsOn = "[cChocoPackageInstaller]chocolateyLicensedExtension"
Name = "chocolatey-agent"
}
cChocoConfig centralManagementServiceUrl {
DependsOn = "[cChocoPackageInstaller]chocolateyAgent"
ConfigName = "CentralManagementServiceUrl"
Value = $ChocolateyCentralManagementUrl
}
if ($ChocolateyCentralManagementClientSalt) {
cChocoConfig centralManagementClientSalt {
DependsOn = "[cChocoPackageInstaller]chocolateyAgent"
ConfigName = "centralManagementClientCommunicationSaltAdditivePassword"
Value = $ChocolateyCentralManagementClientSalt
}
}
if ($ChocolateyCentralManagementServiceSalt) {
cChocoConfig centralManagementServiceSalt {
DependsOn = "[cChocoPackageInstaller]chocolateyAgent"
ConfigName = "centralManagementServiceCommunicationSaltAdditivePassword"
Value = $ChocolateyCentralManagementServiceSalt
}
}
cChocoFeature useCentralManagement {
DependsOn = "[cChocoPackageInstaller]chocolateyAgent"
FeatureName = "useChocolateyCentralManagement"
Ensure = "Present"
}
cChocoFeature useCentralManagementDeployments {
DependsOn = "[cChocoPackageInstaller]chocolateyAgent"
FeatureName = "useChocolateyCentralManagementDeployments"
Ensure = "Present"
}
}
}
}
# If working this into an existing configuration with a good method for
$ConfigData = @{
AllNodes = @(
@{
NodeName = "localhost"
PSDscAllowPlainTextPassword = $true
}
)
}
try {
Push-Location $env:Temp
$Config = ChocolateyConfig -ConfigurationData $ConfigData
Start-DscConfiguration -Path $Config.PSParentPath -Wait -Verbose -Force
} finally {
Pop-Location
}
Requires Puppet Chocolatey Provider module. See docs at https://forge.puppet.com/puppetlabs/chocolatey.
If Applicable - Chocolatey Configuration/Installation
## 1. REQUIREMENTS ##
### Here are the requirements necessary to ensure this is successful.
### a. Internal/Private Cloud Repository Set Up ###
#### You'll need an internal/private cloud repository you can use. These are
#### generally really quick to set up and there are quite a few options.
#### Chocolatey Software recommends Nexus, Artifactory Pro, or ProGet as they
#### are repository servers and will give you the ability to manage multiple
#### repositories and types from one server installation.
### b. Download Chocolatey Package and Put on Internal Repository ###
#### You need to have downloaded the Chocolatey package as well.
#### Please see https://chocolatey.org/install#organization
### c. Other Requirements ###
#### i. Requires puppetlabs/chocolatey module
#### See https://forge.puppet.com/puppetlabs/chocolatey
## 2. TOP LEVEL VARIABLES ##
### a. Your internal repository url (the main one). ###
#### Should be similar to what you see when you browse
#### to https://community.chocolatey.org/api/v2/
$_repository_url = 'INTERNAL REPO URL'
### b. Chocolatey nupkg download url ###
#### This url should result in an immediate download when you navigate to it in
#### a web browser
$_choco_download_url = 'INTERNAL REPO URL/package/chocolatey.1.1.0.nupkg'
### c. Chocolatey Central Management (CCM) ###
#### If using CCM to manage Chocolatey, add the following:
#### i. Endpoint URL for CCM
# $_chocolatey_central_management_url = 'https://chocolatey-central-management:24020/ChocolateyManagementService'
#### ii. If using a Client Salt, add it here
# $_chocolatey_central_management_client_salt = "clientsalt"
#### iii. If using a Service Salt, add it here
# $_chocolatey_central_management_service_salt = 'servicesalt'
## 3. ENSURE CHOCOLATEY IS INSTALLED ##
### Ensure Chocolatey is installed from your internal repository
### Note: `chocolatey_download_url is completely different than normal
### source locations. This is directly to the bare download url for the
### chocolatey.nupkg, similar to what you see when you browse to
### https://community.chocolatey.org/api/v2/package/chocolatey
class {'chocolatey':
chocolatey_download_url => $_choco_download_url,
use_7zip => false,
}
## 4. CONFIGURE CHOCOLATEY BASELINE ##
### a. FIPS Feature ###
#### If you need FIPS compliance - make this the first thing you configure
#### before you do any additional configuration or package installations
#chocolateyfeature {'useFipsCompliantChecksums':
# ensure => enabled,
#}
### b. Apply Recommended Configuration ###
#### Move cache location so Chocolatey is very deterministic about
#### cleaning up temporary data and the location is secured to admins
chocolateyconfig {'cacheLocation':
value => 'C:\ProgramData\chocolatey\cache',
}
#### Increase timeout to at least 4 hours
chocolateyconfig {'commandExecutionTimeoutSeconds':
value => '14400',
}
#### Turn off download progress when running choco through integrations
chocolateyfeature {'showDownloadProgress':
ensure => disabled,
}
### c. Sources ###
#### Remove the default community package repository source
chocolateysource {'chocolatey':
ensure => absent,
location => 'https://community.chocolatey.org/api/v2/',
}
#### Add internal default sources
#### You could have multiple sources here, so we will provide an example
#### of one using the remote repo variable here
#### NOTE: This EXAMPLE requires changes
chocolateysource {'internal_chocolatey':
ensure => present,
location => $_repository_url,
priority => 1,
username => 'optional',
password => 'optional,not ensured',
bypass_proxy => true,
admin_only => false,
allow_self_service => false,
}
### b. Keep Chocolatey Up To Date ###
#### Keep chocolatey up to date based on your internal source
#### You control the upgrades based on when you push an updated version
#### to your internal repository.
#### Note the source here is to the OData feed, similar to what you see
#### when you browse to https://community.chocolatey.org/api/v2/
package {'chocolatey':
ensure => latest,
provider => chocolatey,
source => $_repository_url,
}
## 5. ENSURE CHOCOLATEY FOR BUSINESS ##
### If you don't have Chocolatey for Business (C4B), you'll want to remove from here down.
### a. Ensure The License File Is Installed ###
#### Create a license package using script from https://docs.chocolatey.org/en-us/guides/organizations/organizational-deployment-guide#exercise-4-create-a-package-for-the-license
# TODO: Add resource for installing/ensuring the chocolatey-license package
package {'chocolatey-license':
ensure => latest,
provider => chocolatey,
source => $_repository_url,
}
### b. Disable The Licensed Source ###
#### The licensed source cannot be removed, so it must be disabled.
#### This must occur after the license has been set by the license package.
## Disabled sources still need all other attributes until
## https://tickets.puppetlabs.com/browse/MODULES-4449 is resolved.
## Password is necessary with user, but not ensurable, so it should not
## matter what it is set to here. If you ever do get into trouble here,
## the password is your license GUID.
chocolateysource {'chocolatey.licensed':
ensure => disabled,
priority => '10',
user => 'customer',
password => '1234',
require => Package['chocolatey-license'],
}
### c. Ensure Chocolatey Licensed Extension ###
#### You will have downloaded the licensed extension to your internal repository
#### as you have disabled the licensed repository in step 5b.
#### Ensure the chocolatey.extension package (aka Chocolatey Licensed Extension)
package {'chocolatey.extension':
ensure => latest,
provider => chocolatey,
source => $_repository_url,
require => Package['chocolatey-license'],
}
#### The Chocolatey Licensed Extension unlocks all of the following, which also have configuration/feature items available with them. You may want to visit the feature pages to see what you might want to also enable:
#### - Package Builder - https://docs.chocolatey.org/en-us/features/paid/package-builder
#### - Package Internalizer - https://docs.chocolatey.org/en-us/features/paid/package-internalizer
#### - Package Synchronization (3 components) - https://docs.chocolatey.org/en-us/features/paid/package-synchronization
#### - Package Reducer - https://docs.chocolatey.org/en-us/features/paid/package-reducer
#### - Package Audit - https://docs.chocolatey.org/en-us/features/paid/package-audit
#### - Package Throttle - https://docs.chocolatey.org/en-us/features/paid/package-throttle
#### - CDN Cache Access - https://docs.chocolatey.org/en-us/features/paid/private-cdn
#### - Branding - https://docs.chocolatey.org/en-us/features/paid/branding
#### - Self-Service Anywhere (more components will need to be installed and additional configuration will need to be set) - https://docs.chocolatey.org/en-us/features/paid/self-service-anywhere
#### - Chocolatey Central Management (more components will need to be installed and additional configuration will need to be set) - https://docs.chocolatey.org/en-us/features/paid/chocolatey-central-management
#### - Other - https://docs.chocolatey.org/en-us/features/paid/
### d. Ensure Self-Service Anywhere ###
#### If you have desktop clients where users are not administrators, you may
#### to take advantage of deploying and configuring Self-Service anywhere
chocolateyfeature {'showNonElevatedWarnings':
ensure => disabled,
}
chocolateyfeature {'useBackgroundService':
ensure => enabled,
}
chocolateyfeature {'useBackgroundServiceWithNonAdministratorsOnly':
ensure => enabled,
}
chocolateyfeature {'allowBackgroundServiceUninstallsFromUserInstallsOnly':
ensure => enabled,
}
chocolateyconfig {'backgroundServiceAllowedCommands':
value => 'install,upgrade,uninstall',
}
### e. Ensure Chocolatey Central Management ###
#### If you want to manage and report on endpoints, you can set up and configure
### Central Management. There are multiple portions to manage, so you'll see
### a section on agents here along with notes on how to configure the server
### side components.
if $_chocolatey_central_management_url {
package {'chocolatey-agent':
ensure => latest,
provider => chocolatey,
source => $_repository_url,
require => Package['chocolatey-license'],
}
chocolateyconfig {'CentralManagementServiceUrl':
value => $_chocolatey_central_management_url,
}
if $_chocolatey_central_management_client_salt {
chocolateyconfig {'centralManagementClientCommunicationSaltAdditivePassword':
value => $_chocolatey_central_management_client_salt,
}
}
if $_chocolatey_central_management_service_salt {
chocolateyconfig {'centralManagementClientCommunicationSaltAdditivePassword':
value => $_chocolatey_central_management_client_salt,
}
}
chocolateyfeature {'useChocolateyCentralManagement':
ensure => enabled,
require => Package['chocolatey-agent'],
}
chocolateyfeature {'useChocolateyCentralManagementDeployments':
ensure => enabled,
require => Package['chocolatey-agent'],
}
}
Need Help? View our docs or file an issue.
There is already a version of this package in your Script Builder
Current Version | New Version |
---|---|
- Passing
- Failing
- Pending
- Unknown / Exempted

Downloads:
18,476
Downloads of v 3.38.4:
37
Last Update:
05 May 2022
Package Maintainer(s):
Software Author(s):
- D. Richard Hipp
- SQLite contributors
Tags:
sqlite db database analyzer embedded hwaci
SQLite Analyzer
This is not the latest version of SQLite Analyzer available.
- 1
- 2
- 3
3.38.4 | Updated: 05 May 2022
Downloads:
18,476
Downloads of v 3.38.4:
37
Maintainer(s):
Software Author(s):
- D. Richard Hipp
- SQLite contributors
Edit Package
To edit the metadata for a package, please upload an updated version of the package.
Chocolatey's Community Package Repository currently does not allow updating package metadata on the website. This helps ensure that the package itself (and the source used to build the package) remains the one true source of package metadata.
This does require that you increment the package version.
- 1
- 2
- 3
SQLite Analyzer
3.38.4
This is not the latest version of SQLite Analyzer available.
- 1
- 2
- 3
All Checks are Passing
3 Passing Tests
Deployment Method: Individual Install, Upgrade, & Uninstall
To install SQLite Analyzer, run the following command from the command line or from PowerShell:
To upgrade SQLite Analyzer, run the following command from the command line or from PowerShell:
To uninstall SQLite Analyzer, run the following command from the command line or from PowerShell:
Deployment Method:
📝 NOTE: This applies to both open source and commercial editions of Chocolatey.
1. Enter Your Internal Repository Url
(this should look similar to https://community.chocolatey.org/api/v2/)
2. Setup Your Environment
1. Ensure you are set for organizational deployment
Please see the organizational deployment guide
2. Get the package into your environment
Option 1: Cached Package (Unreliable, Requires Internet - Same As Community)-
Open Source or Commercial:
- Proxy Repository - Create a proxy nuget repository on Nexus, Artifactory Pro, or a proxy Chocolatey repository on ProGet. Point your upstream to https://community.chocolatey.org/api/v2/. Packages cache on first access automatically. Make sure your choco clients are using your proxy repository as a source and NOT the default community repository. See source command for more information.
- You can also just download the package and push it to a repository Download
-
Open Source
-
Download the package:
Download - Follow manual internalization instructions
-
-
Package Internalizer (C4B)
-
Run: (additional options)
choco download sqlite.analyzer --internalize --version=3.38.4 --source=https://community.chocolatey.org/api/v2/
-
For package and dependencies run:
choco push --source="'INTERNAL REPO URL'"
- Automate package internalization
-
Run: (additional options)
3. Copy Your Script
choco upgrade sqlite.analyzer -y --source="'INTERNAL REPO URL'" --version="'3.38.4'" [other options]
See options you can pass to upgrade.
See best practices for scripting.
Add this to a PowerShell script or use a Batch script with tools and in places where you are calling directly to Chocolatey. If you are integrating, keep in mind enhanced exit codes.
If you do use a PowerShell script, use the following to ensure bad exit codes are shown as failures:
choco upgrade sqlite.analyzer -y --source="'INTERNAL REPO URL'" --version="'3.38.4'"
$exitCode = $LASTEXITCODE
Write-Verbose "Exit code was $exitCode"
$validExitCodes = @(0, 1605, 1614, 1641, 3010)
if ($validExitCodes -contains $exitCode) {
Exit 0
}
Exit $exitCode
- name: Install sqlite.analyzer
win_chocolatey:
name: sqlite.analyzer
version: '3.38.4'
source: INTERNAL REPO URL
state: present
See docs at https://docs.ansible.com/ansible/latest/modules/win_chocolatey_module.html.
chocolatey_package 'sqlite.analyzer' do
action :install
source 'INTERNAL REPO URL'
version '3.38.4'
end
See docs at https://docs.chef.io/resource_chocolatey_package.html.
cChocoPackageInstaller sqlite.analyzer
{
Name = "sqlite.analyzer"
Version = "3.38.4"
Source = "INTERNAL REPO URL"
}
Requires cChoco DSC Resource. See docs at https://github.com/chocolatey/cChoco.
package { 'sqlite.analyzer':
ensure => '3.38.4',
provider => 'chocolatey',
source => 'INTERNAL REPO URL',
}
Requires Puppet Chocolatey Provider module. See docs at https://forge.puppet.com/puppetlabs/chocolatey.
4. If applicable - Chocolatey configuration/installation
See infrastructure management matrix for Chocolatey configuration elements and examples.
This package was approved as a trusted package on 05 May 2022.
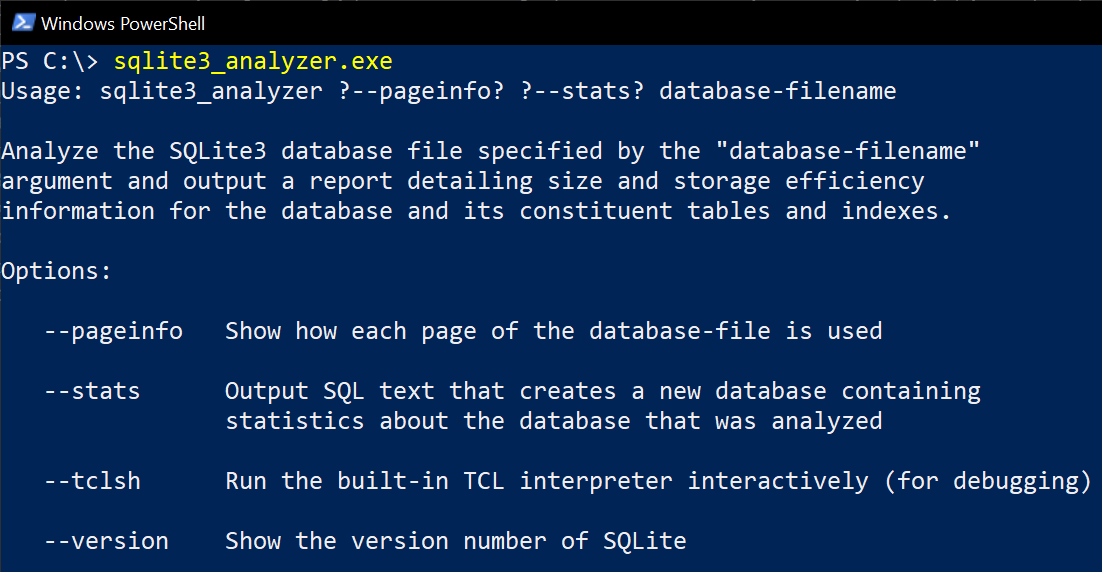
SQLite Analyzer is a command-line utility program that measures and displays how much and how efficiently space is used
by individual tables and indexes with an SQLite database file.
The sqlite3_analyzer.exe
binary is a command-line utility program that measures and displays how much and how
efficiently space is used by individual tables and indexes with an SQLite database file. Example usage:
sqlite3_analyzer database.sqlite
The output is a human-readable ASCII text report that provides information on the space utilization of the database
file. The report is intended to be self-explanatory, though there is some additional explanation of the various
parameters reported toward the end of the report.
The output is also valid SQL. Most of the report text is contained within a header comment, with various SQL statements
that create and initialize a database at the end of the report.
The constructed database contains the raw data from which the report was extracted. Hence the original report can be
read into an instance of the command-line shell and then the raw data can be queried to dig deeper into the space
utilization of a particular database file.
Notes
- The
sqlite3_analyzer.exe
program is a TCL program that uses the dbstat virtual table
to gather information about the database file and then format that information neatly. - This package is automatically updated using the Chocolatey Automatic Package Update Model (AU).
If you find it is out of date by more than a day or two, please contact the maintainer(s) and let them know the package is no longer updating correctly.
md5: F76F402B3EEF8618F1F9664EF6C6798B | sha1: A4519A1D26B895C6B352C573A53149B94FE205CD | sha256: F1B3F4530B8DE4471DB8DA0A1A98B529FA87E6DD08FEE2805AD2DDF08FBF132C | sha512: 412B7331AC439F2E15399B401552F37D05AEE3FEC5DE2E071FD1BB129185E72472CED2848D0F824FA2F0F79150EC2800DA9F68A3B2AB6BFB73AD64178F5DBF12
$ErrorActionPreference = 'Stop'
$toolsDir = Split-Path -parent $MyInvocation.MyCommand.Definition
$executable = Get-ChildItem -Path $toolsDir 'sqlite?_analyzer.exe' -Recurse
Uninstall-BinFile -Name $executable.Name -Path $executable
$ErrorActionPreference = 'Stop'
$toolsDir = Split-Path -parent $MyInvocation.MyCommand.Definition
$executable = Get-ChildItem -Path $toolsDir 'sqlite?_analyzer.exe' -Recurse
Install-BinFile -Name $executable.Name -Path $executable
VERIFICATION
Verification is intended to assist the Chocolatey moderators and community
in verifying that this package's contents are trustworthy.
The application has been downloaded from the official distribution and can
be verified by:
1. Go to the binary distribution page
https://sqlite.org/download.html
and download the archive sqlite-tools-win32-x86-3380400.zip using the link in
the Precompiled Binaries for Windows section.
Alternatively the archives can be downloaded directly from
https://sqlite.org/2021/sqlite-tools-win32-x86-3380400.zip
2. Extract the file sqlite3.exe from the archive
3. The executable can be validated by comparing checksums
- Use powershell function 'Get-Filehash' - Get-Filehash -algorithm sha256 sqlite3.exe
- Use chocolatey utility 'checksum.exe' - checksum -t sha256 -f sqlite3_analyzer.exe
File: sqlite3_analyzer.exe
ChecksumType: sha256
Checksum: F1B3F4530B8DE4471DB8DA0A1A98B529FA87E6DD08FEE2805AD2DDF08FBF132C
Contents of file LICENSE.txt is obtained from http://www.sqlite.org/copyright.html
SQLite Is Public Domain
All of the code and documentation in SQLite has been dedicated to the public
domain by the authors. All code authors, and representatives of the companies
they work for, have signed affidavits dedicating their contributions to the
public domain and originals of those signed affidavits are stored in a
firesafe at the main offices of Hwaci. Anyone is free to copy, modify,
publish, use, compile, sell, or distribute the original SQLite code, either in
source code form or as a compiled binary, for any purpose, commercial or
non-commercial, and by any means.
The previous paragraph applies to the deliverable code and documentation in
SQLite - those parts of the SQLite library that you actually bundle and ship
with a larger application. Some scripts used as part of the build process (for
example the "configure" scripts generated by autoconf) might fall under other
open-source licenses. Nothing from these build scripts ever reaches the final
deliverable SQLite library, however, and so the licenses associated with those
scripts should not be a factor in assessing your rights to copy and use the
SQLite library.
All of the deliverable code in SQLite has been written from scratch. No code
has been taken from other projects or from the open internet. Every line of
code can be traced back to its original author, and all of those authors have
public domain dedications on file. So the SQLite code base is clean and is
uncontaminated with licensed code from other projects.
Open-Source, not Open-Contribution
SQLite is open-source, meaning that you can make as many copies of it as you
want and do whatever you want with those copies, without limitation. But
SQLite is not open-contribution. In order to keep SQLite in the public domain
and ensure that the code does not become contaminated with proprietary or
licensed content, the project does not accept patches from unknown persons.
All of the code in SQLite is original, having been written specifically for use
by SQLite. No code has been copied from unknown sources on the internet.
Warranty of Title
SQLite is in the public domain and does not require a license. Even so, some
organizations want legal proof of their right to use SQLite. Circumstances
where this occurs include the following:
* Your company desires indemnity against claims of copyright infringement.
* You are using SQLite in a jurisdiction that does not recognize the public
domain.
* You are using SQLite in a jurisdiction that does not recognize the right
of an author to dedicate their work to the public domain.
* You want to hold a tangible legal document as evidence that you have the
legal right to use and distribute SQLite.
* Your legal department tells you that you have to purchase a license.
If any of the above circumstances apply to you, Hwaci, the company that employs
all the developers of SQLite, will sell you a Warranty of Title for SQLite. A
Warranty of Title is a legal document that asserts that the claimed authors of
SQLite are the true authors, and that the authors have the legal right to
dedicate the SQLite to the public domain, and that Hwaci will vigorously defend
against challenges to those claims. All proceeds from the sale of SQLite
Warranties of Title are used to fund continuing improvement and support of
SQLite.
Contributed Code
In order to keep SQLite completely free and unencumbered by copyright, the
project does not accept patches. If you would like to make a suggested change,
and include a patch as a proof-of-concept, that would be great. However please
do not be offended if we rewrite your patch from scratch.
Log in or click on link to see number of positives.
- sqlite3_analyzer.exe (f1b3f4530b8d) - ## / 67
- sqlite.analyzer.3.38.4.nupkg (9c2014c68157) - ## / 64
In cases where actual malware is found, the packages are subject to removal. Software sometimes has false positives. Moderators do not necessarily validate the safety of the underlying software, only that a package retrieves software from the official distribution point and/or validate embedded software against official distribution point (where distribution rights allow redistribution).
Chocolatey Pro provides runtime protection from possible malware.
Add to Builder | Version | Downloads | Last Updated | Status |
---|---|---|---|---|
SQLite Analyzer 3.39.0 | 41 | Sunday, June 26, 2022 | Approved | |
SQLite Analyzer 3.38.5 | 91 | Saturday, May 7, 2022 | Approved | |
SQLite Analyzer 3.38.4 | 37 | Thursday, May 5, 2022 | Approved | |
SQLite Analyzer 3.38.3 | 47 | Friday, April 29, 2022 | Approved | |
SQLite Analyzer 3.38.2 | 97 | Sunday, March 27, 2022 | Approved | |
SQLite Analyzer 3.38.1 | 71 | Sunday, March 13, 2022 | Approved | |
SQLite Analyzer 3.38.0 | 93 | Wednesday, February 23, 2022 | Approved | |
SQLite Analyzer 3.37.2 | 122 | Friday, January 7, 2022 | Approved | |
SQLite Analyzer 3.37.1 | 16 | Friday, December 31, 2021 | Approved | |
SQLite Analyzer 3.37.0 | 79 | Sunday, November 28, 2021 | Approved | |
SQLite Analyzer 3.36.0 | 190 | Saturday, June 19, 2021 | Approved | |
SQLite Analyzer 3.35.5 | 123 | Tuesday, April 20, 2021 | Approved | |
SQLite Analyzer 3.35.4 | 71 | Wednesday, April 14, 2021 | Approved | |
SQLite Analyzer 3.35.3 | 43 | Wednesday, April 14, 2021 | Approved | |
SQLite Analyzer 3.10.1 | 1595 | Thursday, January 14, 2016 | Approved | |
SQLite Analyzer 3.10.0 | 333 | Wednesday, January 6, 2016 | Approved | |
SQLite Analyzer 3.9.2 | 446 | Monday, November 2, 2015 | Approved | |
SQLite Analyzer 3.9.1 | 430 | Friday, October 16, 2015 | Approved | |
SQLite Analyzer 3.9.0 | 413 | Wednesday, October 14, 2015 | Approved | |
SQLite Analyzer 3.8.11.1 | 443 | Wednesday, July 29, 2015 | Approved | |
SQLite Analyzer 3.8.11 | 401 | Monday, July 27, 2015 | Approved | |
SQLite Analyzer 3.8.10.2 | 425 | Thursday, May 21, 2015 | Approved | |
SQLite Analyzer 3.8.10.1 | 414 | Sunday, May 10, 2015 | Approved | |
SQLite Analyzer 3.8.10 | 390 | Saturday, May 9, 2015 | Approved | |
SQLite Analyzer 3.8.9 | 435 | Thursday, April 9, 2015 | Approved | |
SQLite Analyzer 3.8.8.3 | 424 | Friday, February 27, 2015 | Approved | |
SQLite Analyzer 3.8.8.2 | 477 | Sunday, February 1, 2015 | Approved | |
SQLite Analyzer 3.8.8.1 | 436 | Wednesday, January 21, 2015 | Approved | |
SQLite Analyzer 3.8.8 | 428 | Saturday, January 17, 2015 | Approved | |
SQLite Analyzer 3.8.7.4 | 445 | Thursday, December 11, 2014 | Approved | |
SQLite Analyzer 3.8.7.3 | 416 | Sunday, December 7, 2014 | Approved | |
SQLite Analyzer 3.8.7.2 | 442 | Wednesday, November 19, 2014 | Approved | |
SQLite Analyzer 3.8.7.1 | 460 | Thursday, October 30, 2014 | Approved | |
SQLite Analyzer 3.8.7 | 461 | Saturday, October 18, 2014 | Approved | |
SQLite Analyzer 3.8.6 | 524 | Saturday, August 16, 2014 | Approved | |
SQLite.analyzer 3.8.5 | 460 | Thursday, June 5, 2014 | Approved | |
SQLite.analyzer 3.8.4.3 | 477 | Friday, April 4, 2014 | Approved | |
SQLite.analyzer 3.8.4.2 | 466 | Thursday, March 27, 2014 | Approved | |
SQLite.analyzer 3.8.4.1 | 427 | Wednesday, March 12, 2014 | Approved | |
SQLite.analyzer 3.8.4 | 442 | Tuesday, March 11, 2014 | Approved | |
SQLite.analyzer 3.8.3.1 | 480 | Wednesday, February 12, 2014 | Approved | |
SQLite.analyzer 3.8.3 | 398 | Tuesday, February 4, 2014 | Approved | |
SQLite.analyzer 3.8.2 | 473 | Saturday, December 7, 2013 | Approved | |
SQLite.analyzer 3.8.1 | 471 | Friday, October 18, 2013 | Approved | |
SQLite.analyzer 3.8.0.2 | 491 | Tuesday, September 10, 2013 | Approved | |
SQLite.analyzer 3.7.17.20130622 | 480 | Saturday, June 22, 2013 | Approved | |
SQLite.analyzer 3.7.17 | 476 | Saturday, June 22, 2013 | Approved | |
SQLite.analyzer 3.7.11.0 | 554 | Wednesday, April 11, 2012 | Approved | |
SQLite.analyzer 3.7.10.0 | 497 | Sunday, January 22, 2012 | Approved | |
SQLite.analyzer 3.7.8.0 | 525 | Monday, October 3, 2011 | Approved |
None - SQLite Analyzer is dedicated to the public domain
This package has no dependencies.
Ground Rules:
- This discussion is only about SQLite Analyzer and the SQLite Analyzer package. If you have feedback for Chocolatey, please contact the Google Group.
- This discussion will carry over multiple versions. If you have a comment about a particular version, please note that in your comments.
- The maintainers of this Chocolatey Package will be notified about new comments that are posted to this Disqus thread, however, it is NOT a guarantee that you will get a response. If you do not hear back from the maintainers after posting a message below, please follow up by using the link on the left side of this page or follow this link to contact maintainers. If you still hear nothing back, please follow the package triage process.
- Tell us what you love about the package or SQLite Analyzer, or tell us what needs improvement.
- Share your experiences with the package, or extra configuration or gotchas that you've found.
- If you use a url, the comment will be flagged for moderation until you've been whitelisted. Disqus moderated comments are approved on a weekly schedule if not sooner. It could take between 1-5 days for your comment to show up.